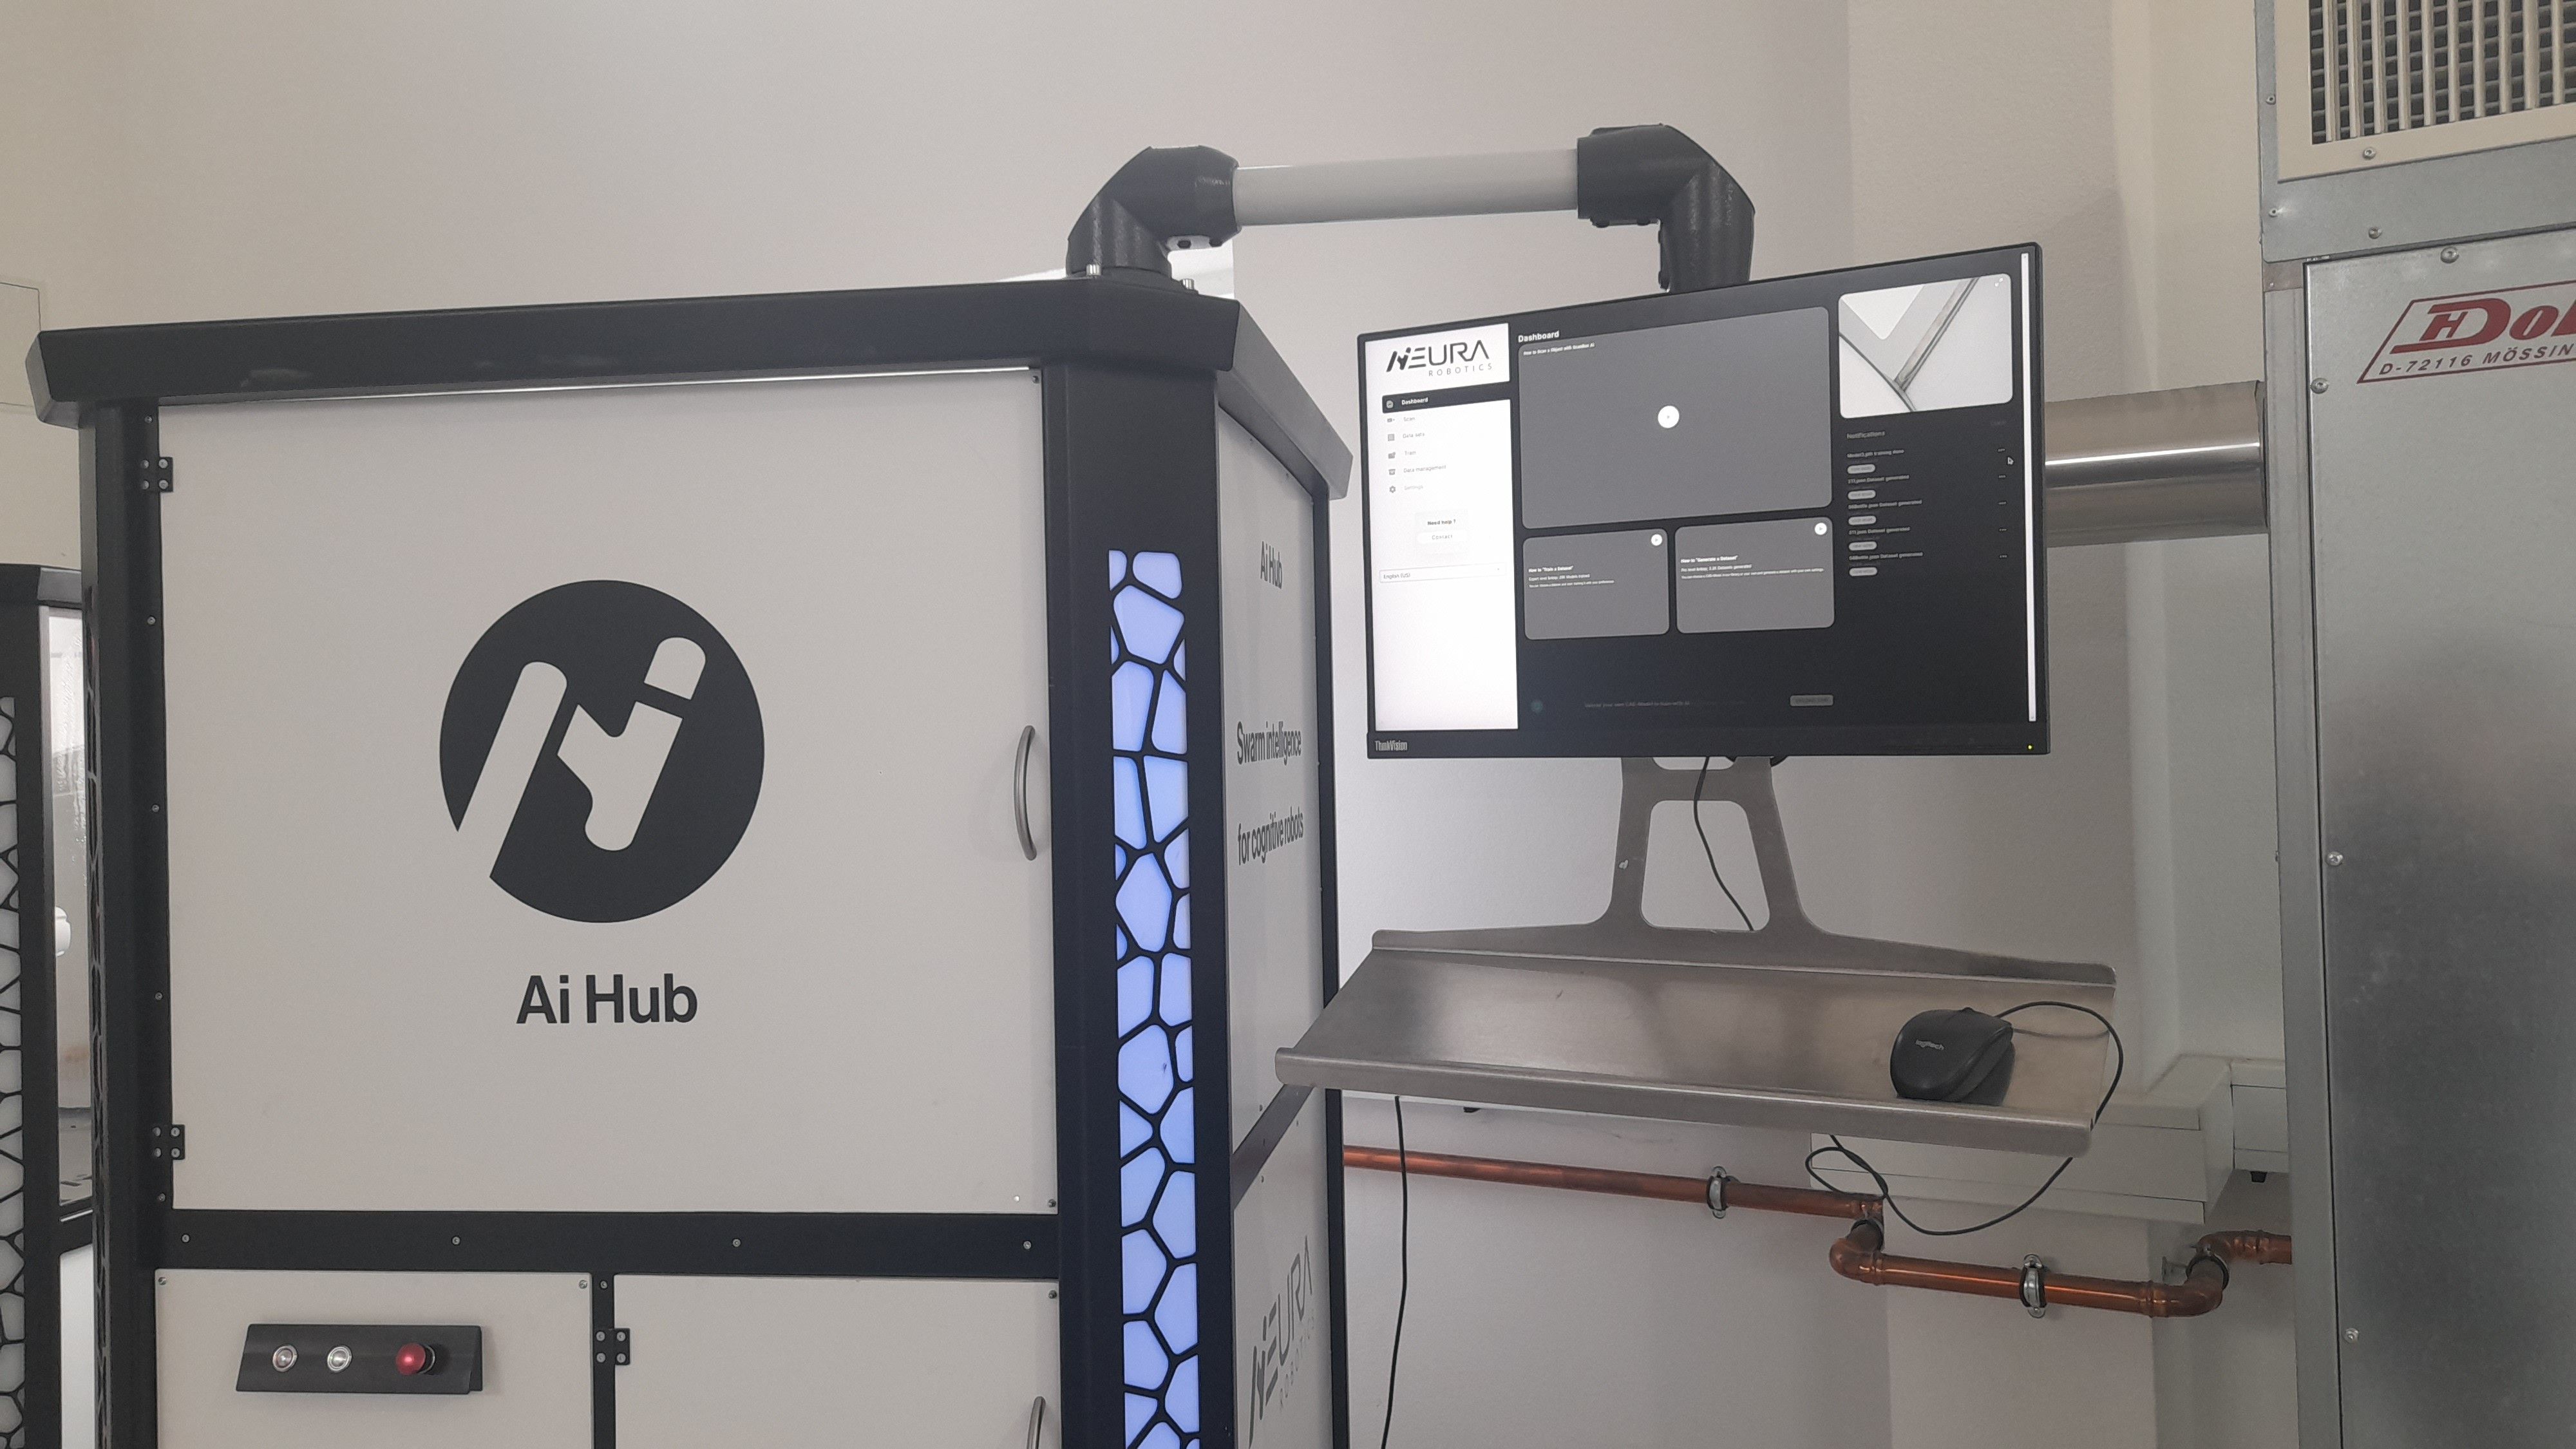
AI Hub
The AI Hub, a brainchild of Neura Robotics, serves as a multifaceted platform. A fully equipped AI Hub unlocks a range of functionalities:
3D Object Scanning: Create comprehensive 3D models of objects, including the ability to perform multi-scans for enhanced accuracy.
Real-World Image Data Capture: Scan objects or sets of objects to generate real-world image data for annotation purposes.
Synthetic Image Generation: Generate a vast quantity of richly annotated synthetic high quality images.
Image Annotation Tools: Leverage the Hub’s intuitive and capable image annotation tools.
Multiple Instance Segmentation Model Training: Train a variety of instance segmentation models, a technique for segmenting objects within images.
Dataset & Model Version Management: Maintain organized control over your datasets and trained models. It includes uploading and downloading 3D and AI models.
Model Inference & Testing: Evaluate the performance of your trained models through inference and testing.
Expanding Horizons (Ongoing Development): The AI Hub continues to evolve, offering additional functionalities under development:
Scalable Computing Power: Provide supplementary computational resources for individual MAiRAs or entire groups.
Distributed Data Collection: Facilitate the collection of data from multiple MAiRAs connected to a centralized AI Hub.
Centralized Cloud & Computing Hub: Establish a secure, local cloud storage and processing center for a group of MAiRAs.
Robotic Software Updates & Troubleshooting: Implement a centralized system for updating and troubleshooting software packages across a fleet of MAiRAs.
Voice Command Training & Data Collection: Develop functionalities for data generation, collection, and training for voice command recognition.
The AI Hub can be accessed by clicking on the AI Hub Switch Button. You can find it by first clicking on the button located on the upper left corner in the navigation bar and then on the button.
The graphical user interface of AI Hub contains five sections: Data Management, Data Generation, Data Annotation, Train and AI Dev Arena. To switch back to robot mode, use the button.
Hint
To change the language, choose from the dropdown in the navigation bar on the left.
Training Process Overview
The general process of training a model using AI Hub can be split into three steps:
Registering Objects
Generating a Dataset
Training an AI Model
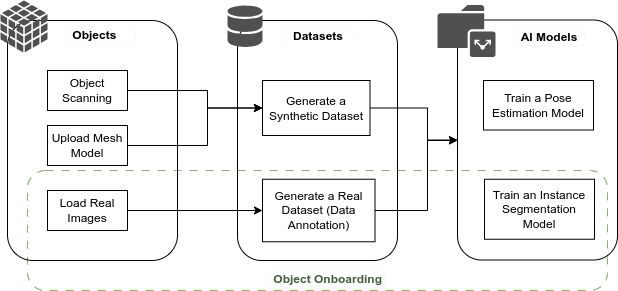
Having knowledge of an object’s dimensions and texture information is crucial to creating an accurate digital twin of the object. Registration of an object is primarily done by uploading a mesh model of the object. When a mesh model file of a desired object is unavailable, one could 3D scan the object using Neura AI Scan Box.
Every powerful AI model is empowered by having an equally rich dataset. There are two types of datasets that can be generated using AI Hub.
Synthetic datasets are created using a pipeline whereby an object mesh model is simulated in a scene with other distractor objects under various lighting conditions and positions. Then, images are captured from various angles and are automatically annotated.
Real datasets are created by capturing images using the robot’s vision sensors and agile robot arm, followed by a semi-automated annotation process.
Important
Training of Pose Estimation Models is currently not available. 3D Pose Estimation can be done based on non-Deep-Learning methods with an Instance Segmentation Model and 3D matching algorithms.
Training an AI model for both object detection and object pose estimation using the previously generated dataset is the final step of the training process. A single model can be trained to detect a single object or multiple objects, based on the dataset(s) used during training. The time taken to prepare a model largely depends on the size of the dataset(s), training configuration, and the type of model being trained.
Note
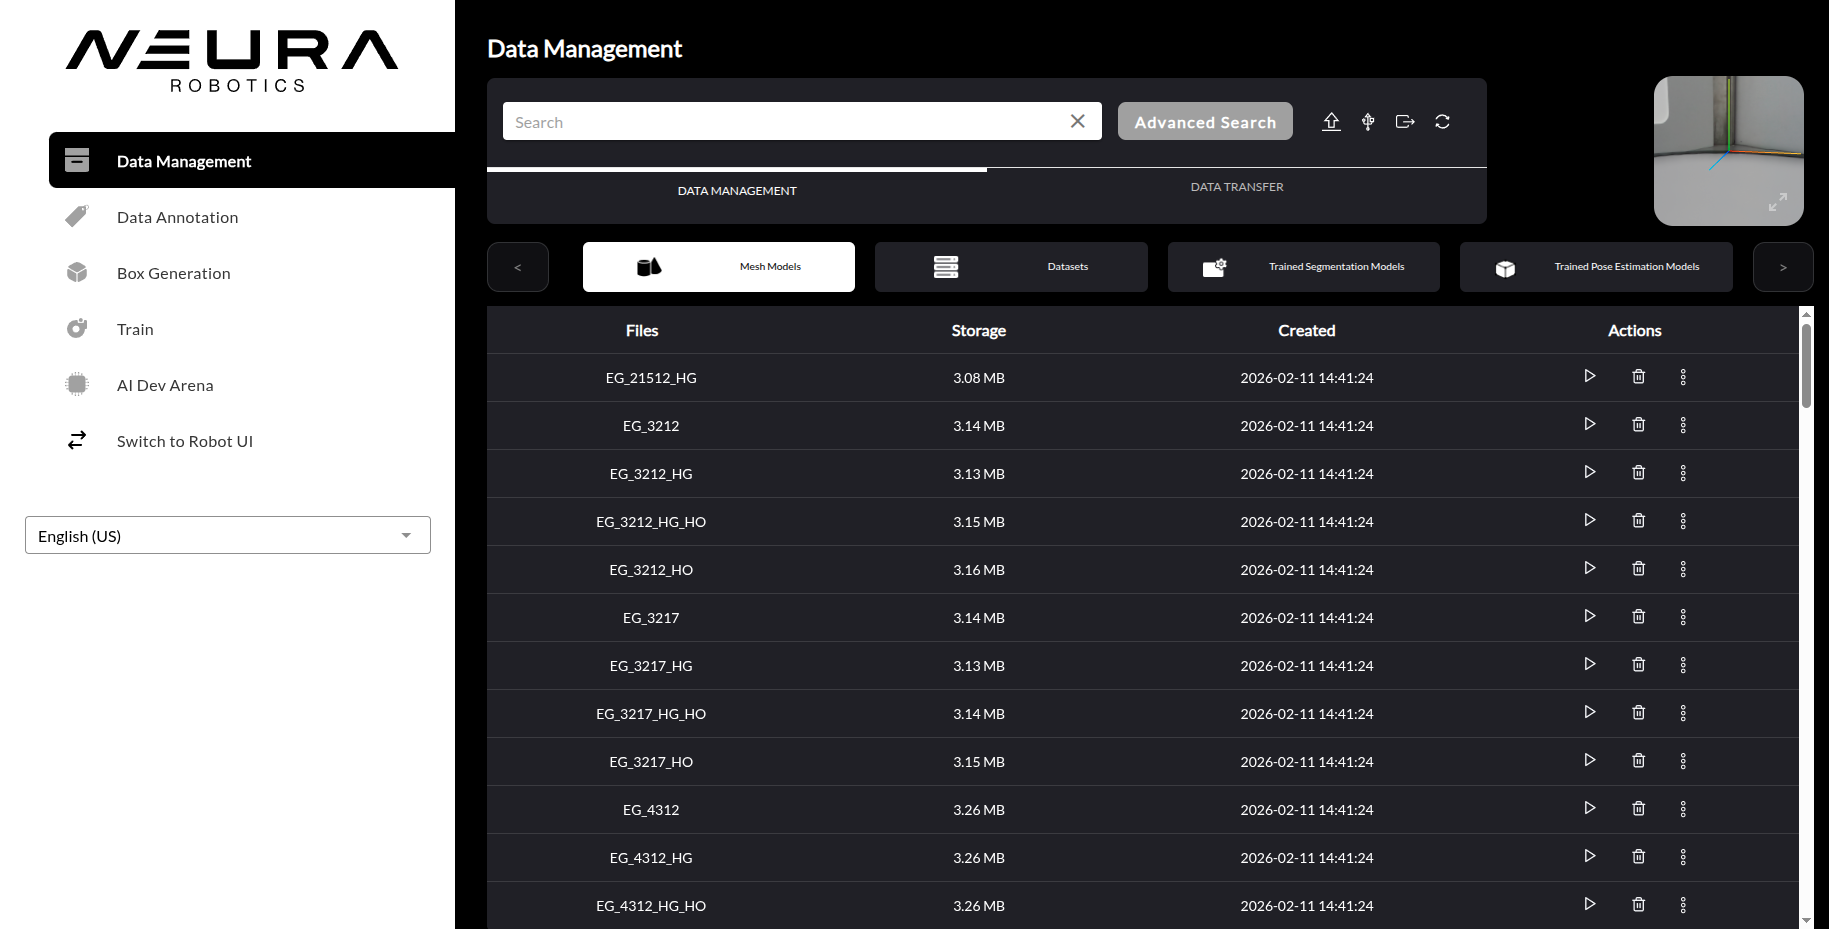
Data Management
Data Management Sub-Tab
In the sub-tab, you have full control over your mesh models, datasets, and trained AI models. This section allows you to efficiently organize and manage your assets by providing options to list, search, inspect, rename, and delete them as needed.
Mesh Models
All objects in the database are displayed in , along with their file name, size and creation date. Using the actions on the right, you can either preview, delete or rename an object. Click the Play button to preview the 3D object.
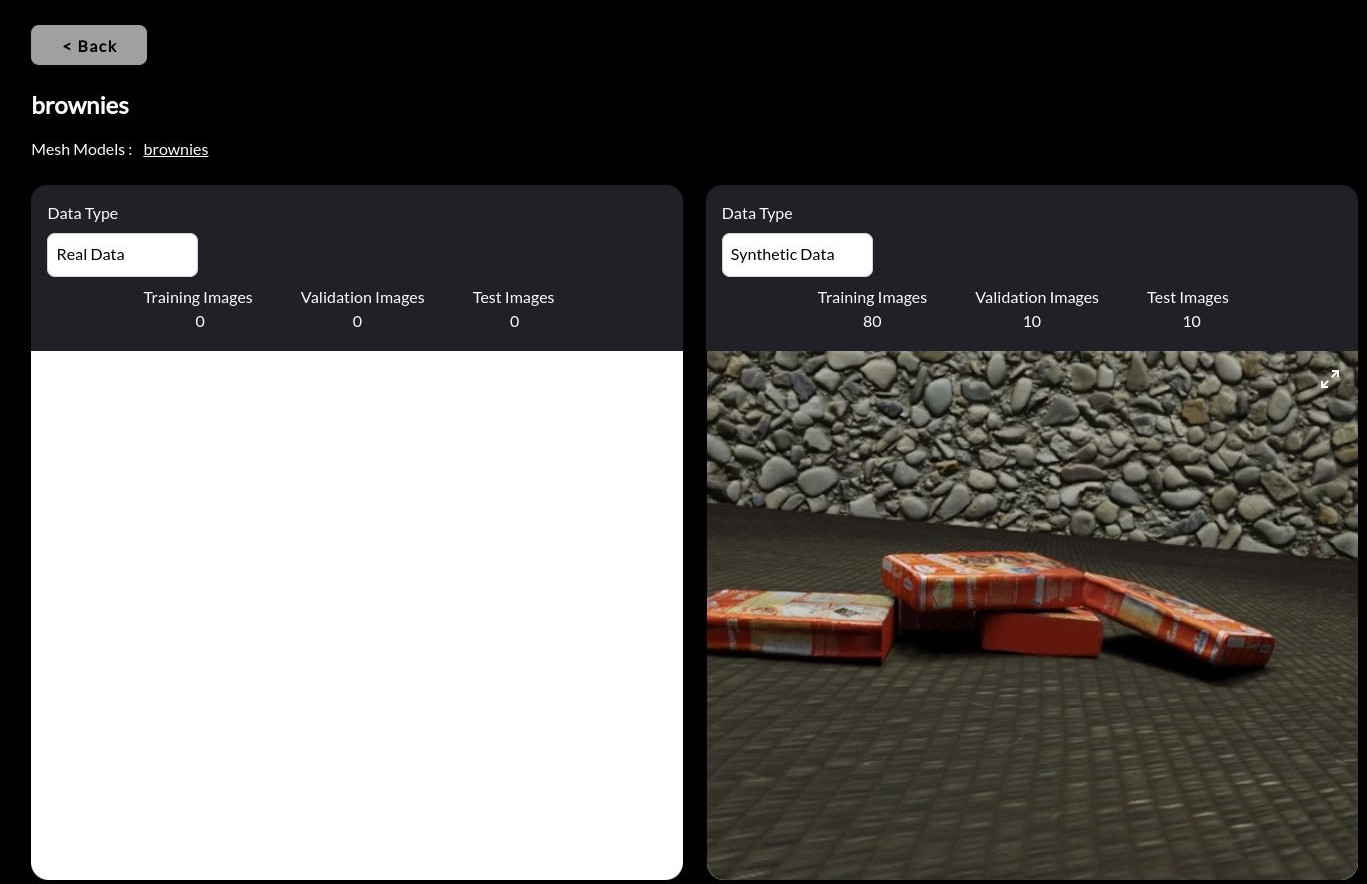
Datasets
In the section, the datasets available can be managed. Click the Play button on the right to get detailed information about the dataset. E.g., object class names, dataset split sizes and a sample image from each data type are displayed.
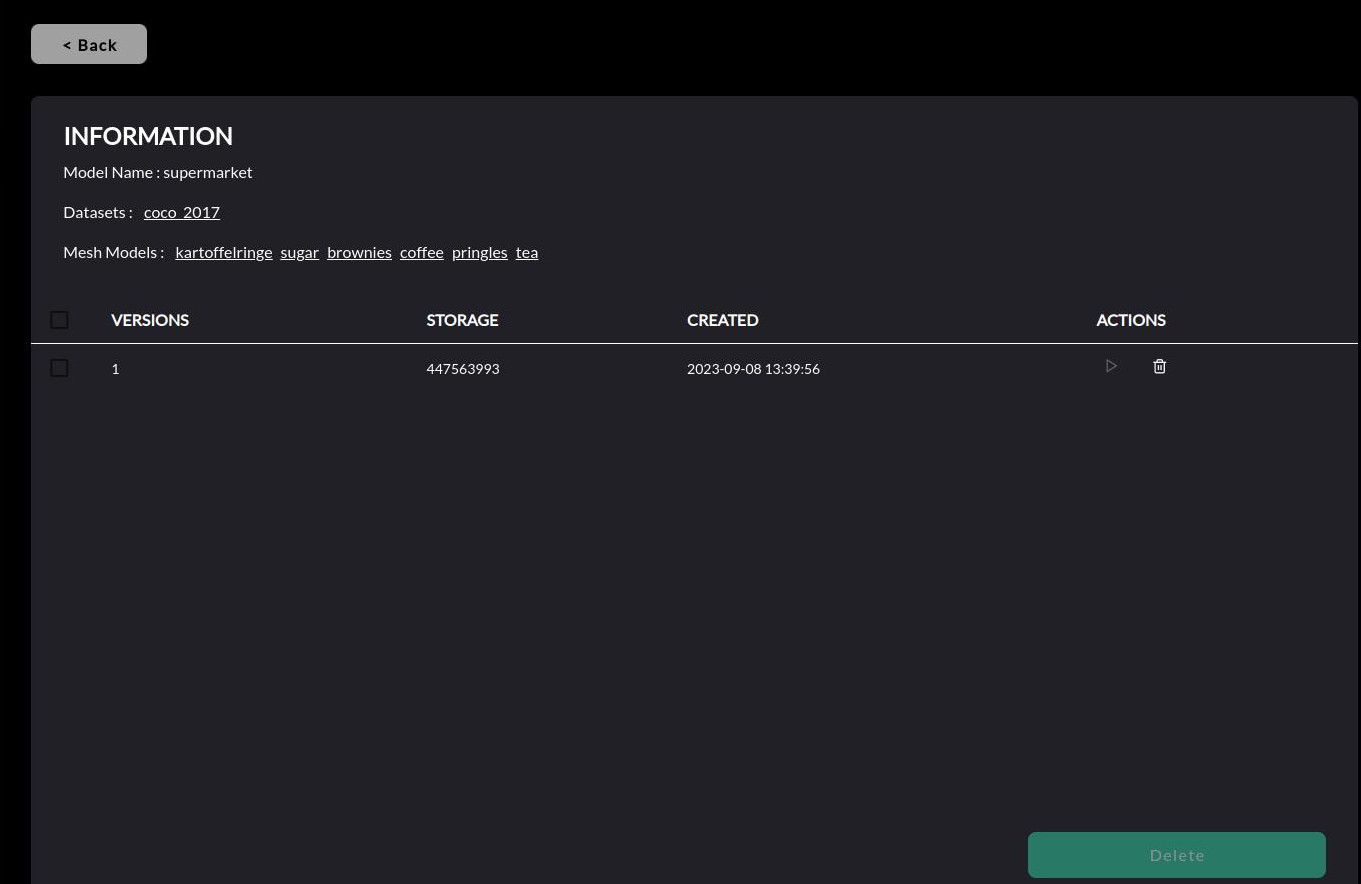
AI Models
Manage pre-trained models and it’s versions in the and sections. Click on the Extend button on the right to get detailed information on the model, e.g., datasets used to train it, objects it can detect etc.
Hint
A new version of an existing model becomes available when a new model with the similar name, dataset(s) and object(s) is trained.
Data Transfer Sub-Tab
The sub-tab allows you to upload custom object meshes and bin meshes to the database from an external drive. The transfer pipeline would extract key attributes of objects within the uploaded mesh file(s), process them, and store them in the database for various tasks across the lifecycle of a robot application.
Note
Mesh model file requirements
Requirement |
Description |
Action to take if requirement is not met |
|---|---|---|
File name |
Match the object name to the mesh file name or the zip file name if the mesh is zipped in a directory. |
None |
Extension |
The mesh file extension is either |
Convert the file to |
Format |
The mesh file format is ASCII |
Export the file as ASCII format using an open-source tool like Blender or MeshLab |
Scale |
The mesh is scaled into millimeters |
None |
Completeness |
All faces are triangulated |
Triangulate the mesh using an open-source tool like Blender or MeshLab |
Axes |
The object is aligned w.r.t. principal axes, with Z-direction pointing upwards |
None |
Texture |
Texture is provided as |
None |
Color information |
Color information is stored in vertices not faces of the mesh |
Transfer color information from face to vertex using an open-source tool like Blender or MeshLab |
Bins Shape |
Rectangular-shaped |
None |
Bins Orientation |
Opening is pointing in +Z direction |
None |
Data Generation
Important
The generation of synthetic datasets is currently not available. For training of instance segmentation models, please use real images and create a synthetic dataset.
The section of AI Hub serves as a crucial bridge between raw information and the structured, labeled datasets required to build effective machine learning models. Whether through human-powered annotation or algorithmic generation, it is designed to make the data preparation phase of the machine learning lifecycle more efficient, scalable, and controllable.
Synthetic Dataset Generation
Synthetic datasets are generated by leveraging algorithms to automatically simulates an object mesh model in a scene with other distractor objects under various lighting conditions and positions. The images are captured from various angles and are automatically annotated. This process is particularly useful for training models in scenarios where real-world data is scarce, expensive to obtain, or raises privacy concerns.
Important
The generated dataset would contain Neura COCO style instance annotation + Neura style 6D pose annotation. Hence, it can be used for BOTH object detection and pose estimation model training.
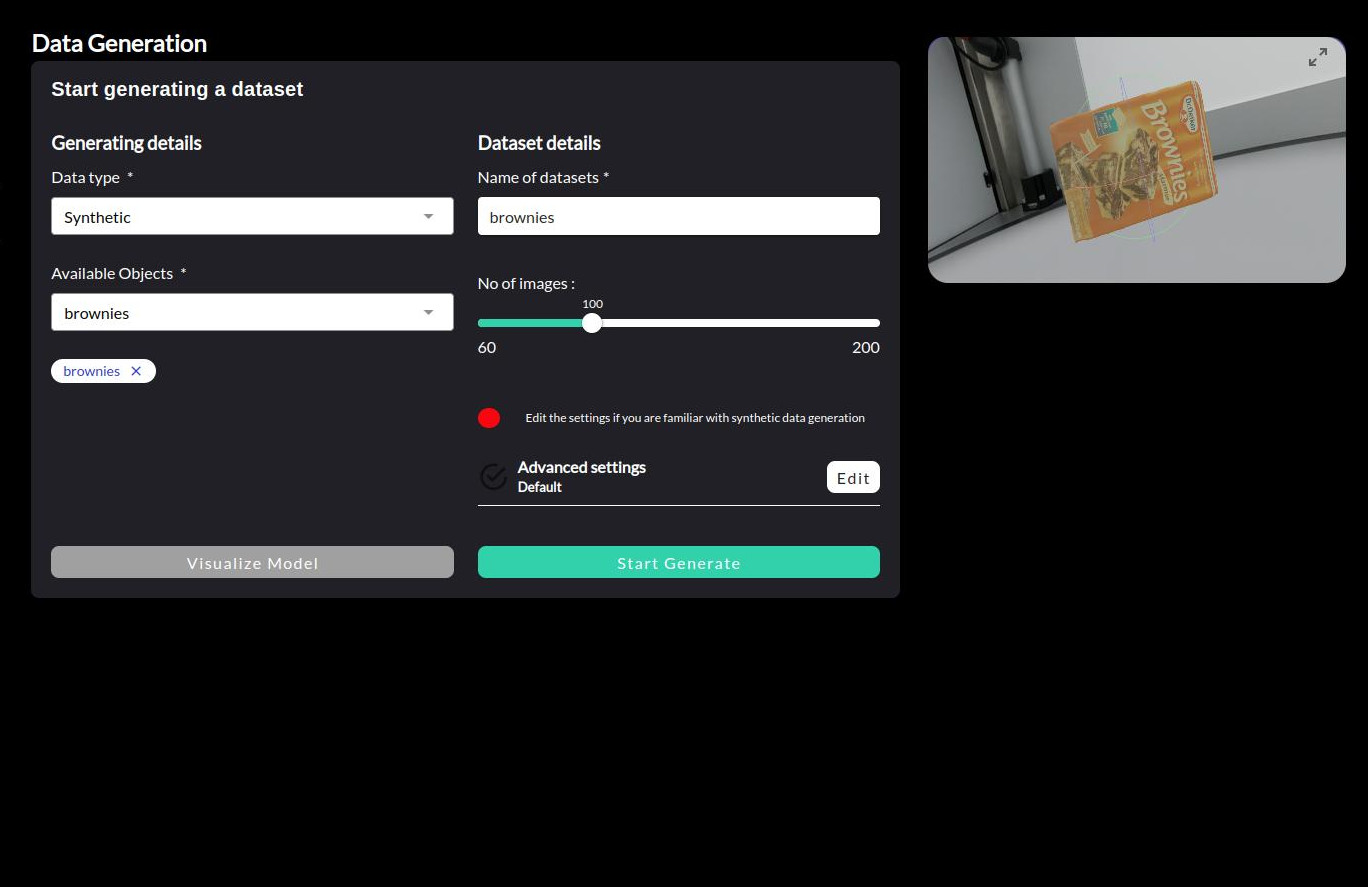
Synthetic Dataset Generation - Basic Parameters
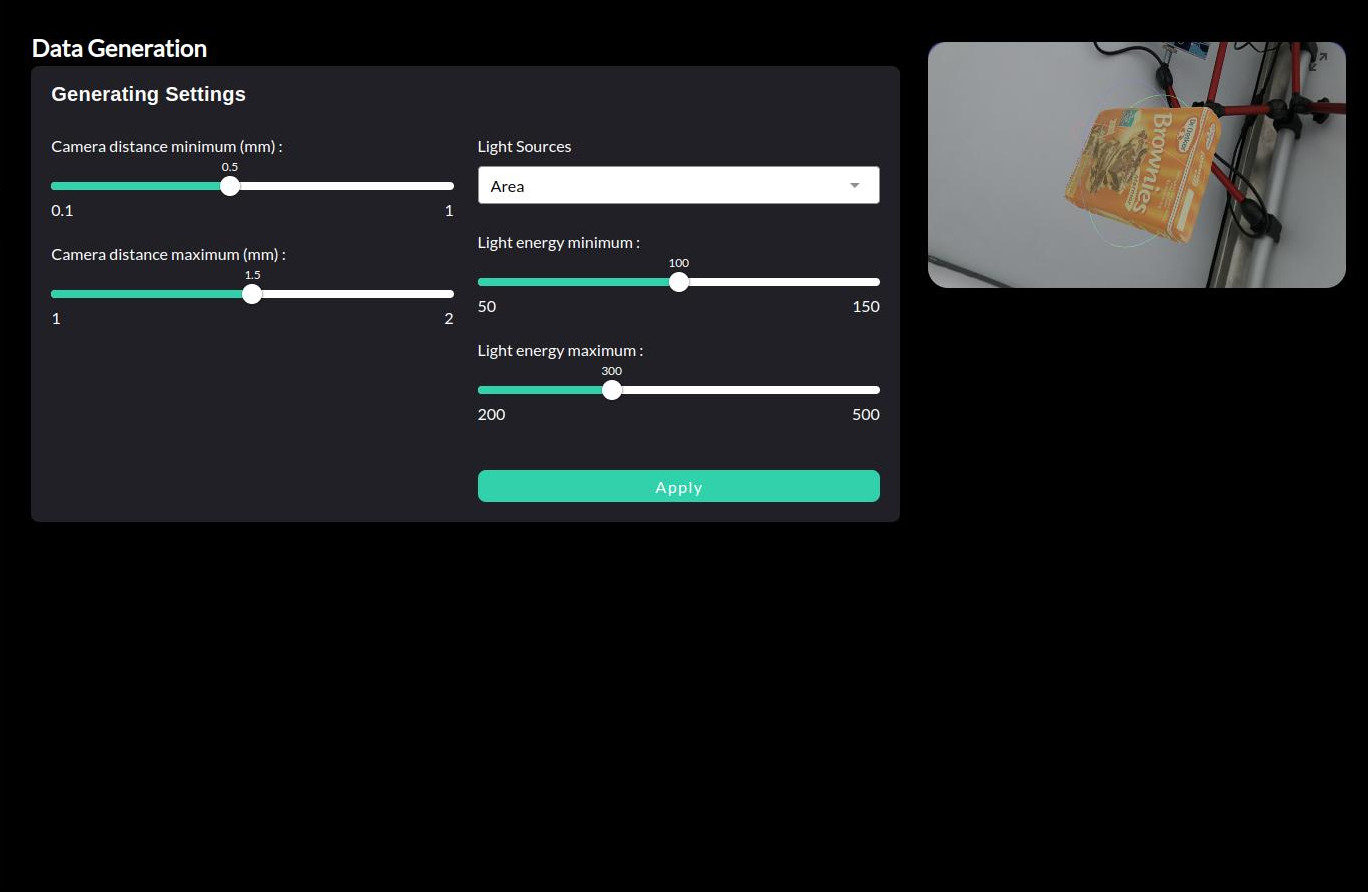
Synthetic Dataset Generation - Advanced Parameters
Note
Real Dataset Generation
Real datasets are created from actual camera feeds or image captures, providing authentic data that reflects real-world conditions, variations, and challenges. This process involves collecting images or videos from physical environments and manually annotating them, with tools like Neura CVAT to create the ground truth labels necessary for model training.
Note
For detailed instructions on creating real datasets, refer to:
Box Generation
The section of AI Hub allows you to define and generate box CAD models directly from their physical parameters. This tool is useful when you want to quickly create a CAD representation of a box for use in training, simulation, or testing workflows.
You can specify:
Name: Identifier for the generated box.
Type: Currently supports Cuboid.
Length, Width, Height (mm): The physical dimensions of the box.
Weight (g): The mass of the box.
Once parameters are entered, press Generate to create and save the corresponding mesh file.
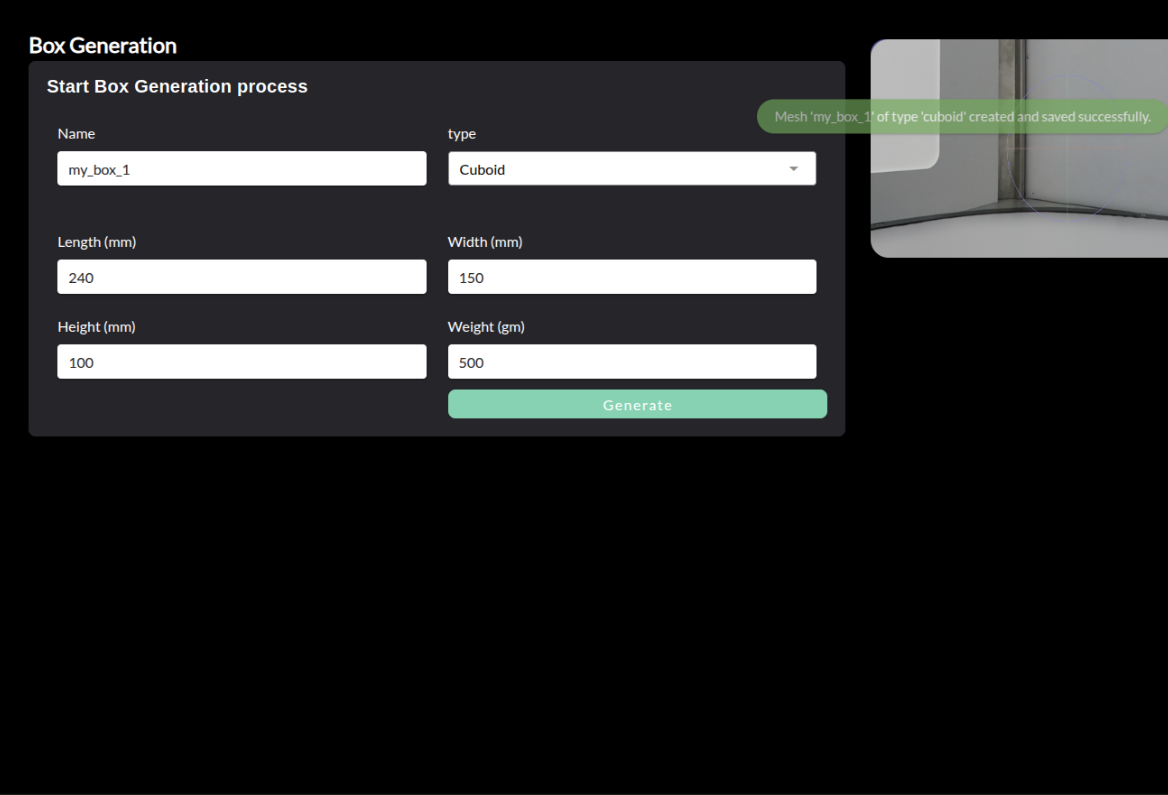
Box Generation - Specify box dimensions and weight to create a CAD model.
Note
Each box must have a unique name. Creating multiple boxes with the same name is not allowed.
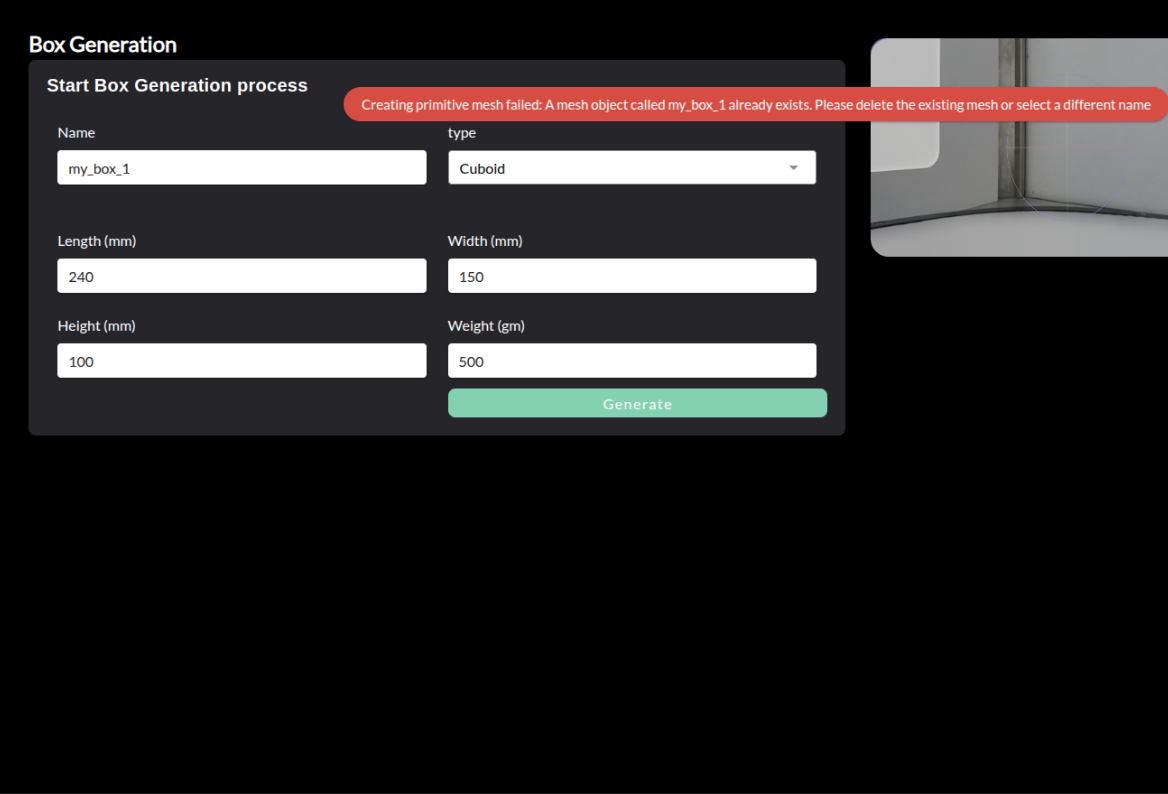
Box Generation - Attempting to create a box with a duplicate name results in an error.
Data Annotation
For training AI models, as well as for assessing the quality of already trained models, we need data with ground truth targets. These annotations can be manually created in a photo editor or a dedicated annotation tool.
Neura CVAT is a specialized computer vision annotation tool developed by Neura, built upon the foundation of the open-source CVAT platform. It provides a powerful and user-friendly interface for labeling images and videos for computer vision tasks.
The system offers comprehensive annotation capabilities including bounding boxes, polygons, and keypoints, along with multi-user labeling functionality for efficient team workflows. These features are essential for tasks like object detection, segmentation, and tracking.
Neura CVAT enhances the base CVAT platform with custom features specifically designed for Neura’s AI development pipeline, while maintaining the robust and flexible nature of the original system.
Note
The guide is simplified to focus on the most common usage scenarios. For more advanced features and options, please refer to the official CVAT documentation.
Note
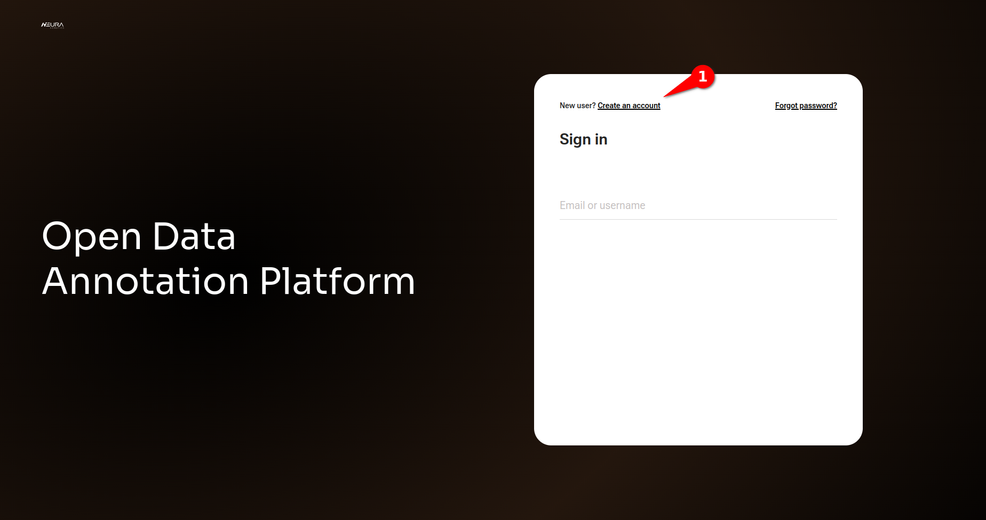
Sign in / Sign up
Access Neura CVAT through your web browser at http://192.168.2.14:8050.
In the start page, you will encounter a login interface, where you enter your email and password.
New users can register by clicking Create an Account:
Create a Project
Labeling is managed through Project functionality. Within each Project, a user can set up task-specific settings, track changes and create versions.
Click + and proceed to Create a new project.
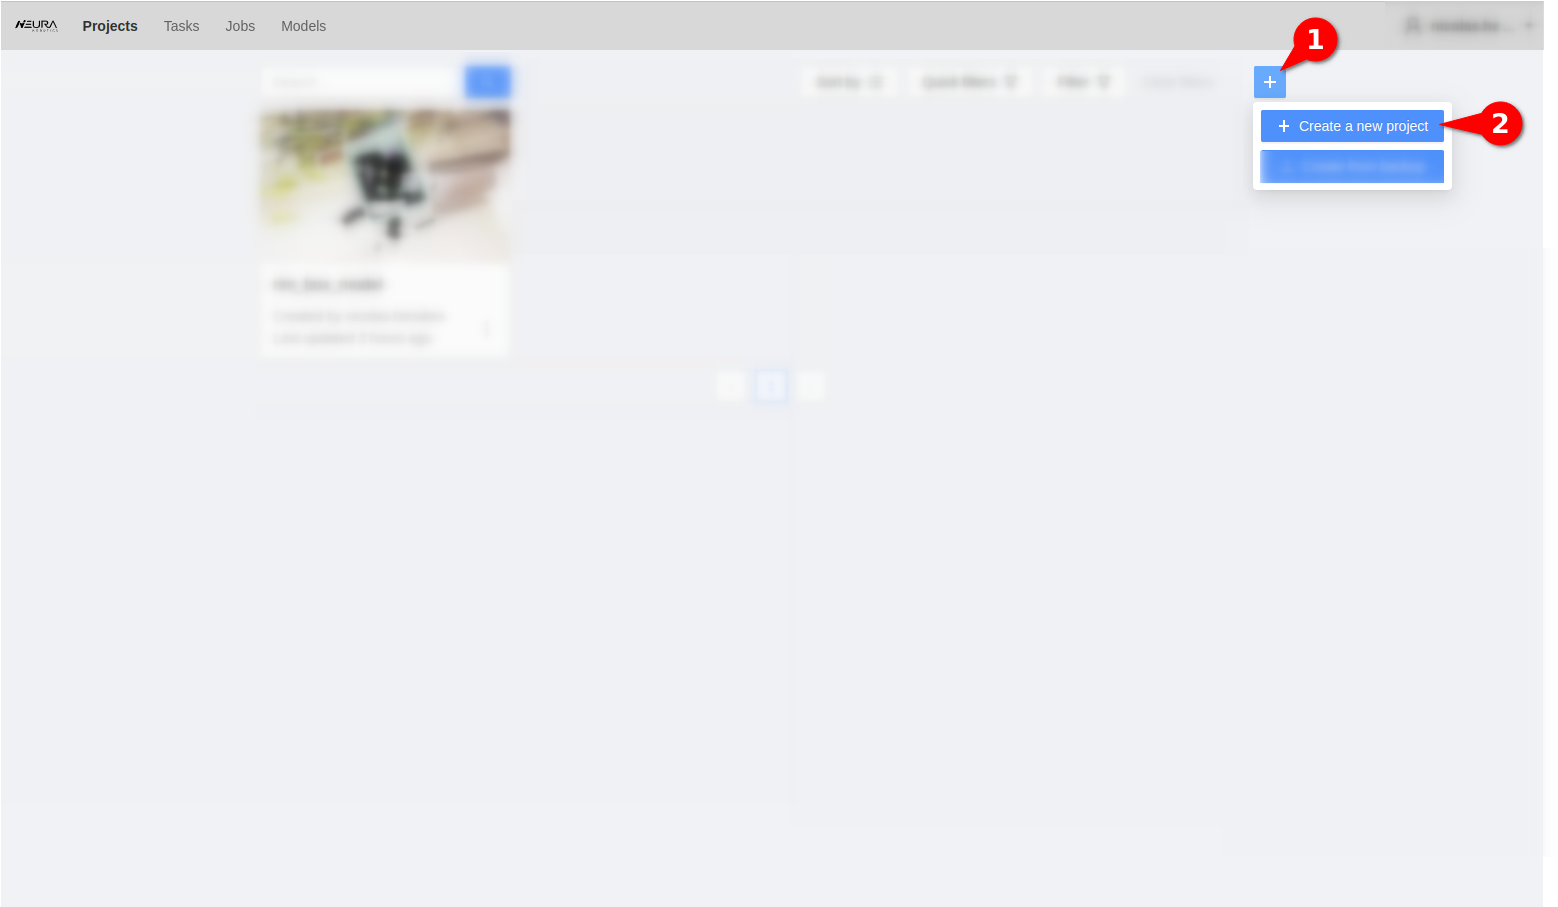
Provide a name for your Project and add labels. Click Submit & Open to complete. Later, you can edit the name, as well as add, modify or remove labels.
Create a Task
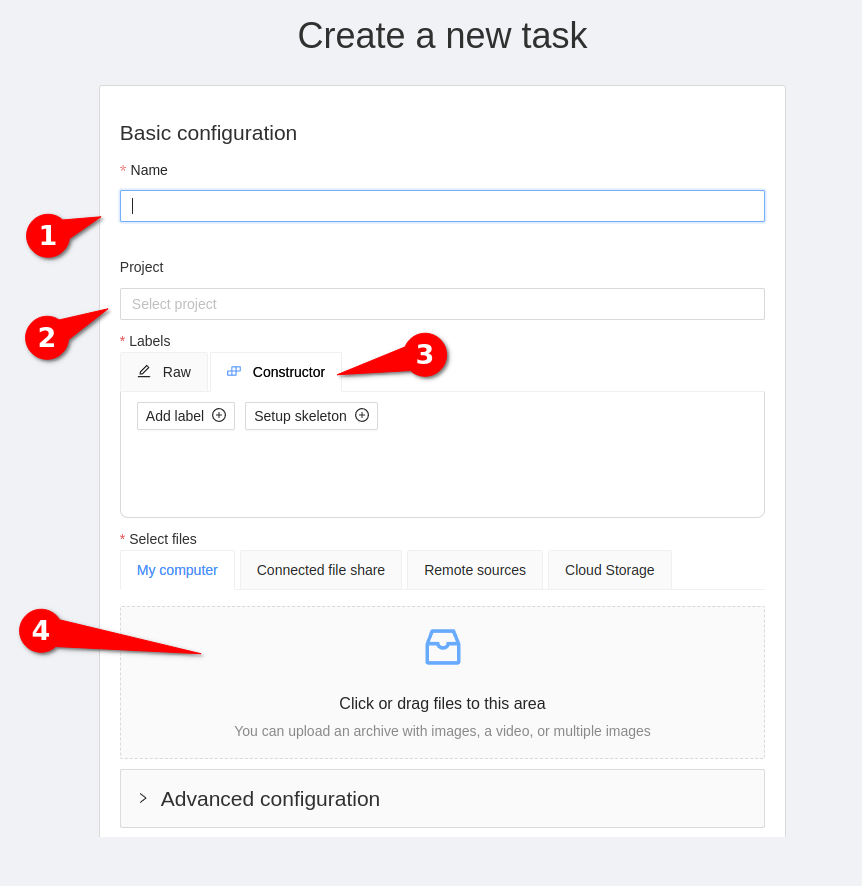
Click on +. Assign a name to the task, associate it with a project, and proceed to Select files. Add images either by dragging them into the designated square or clicking on them. Click Submit & Open to complete.
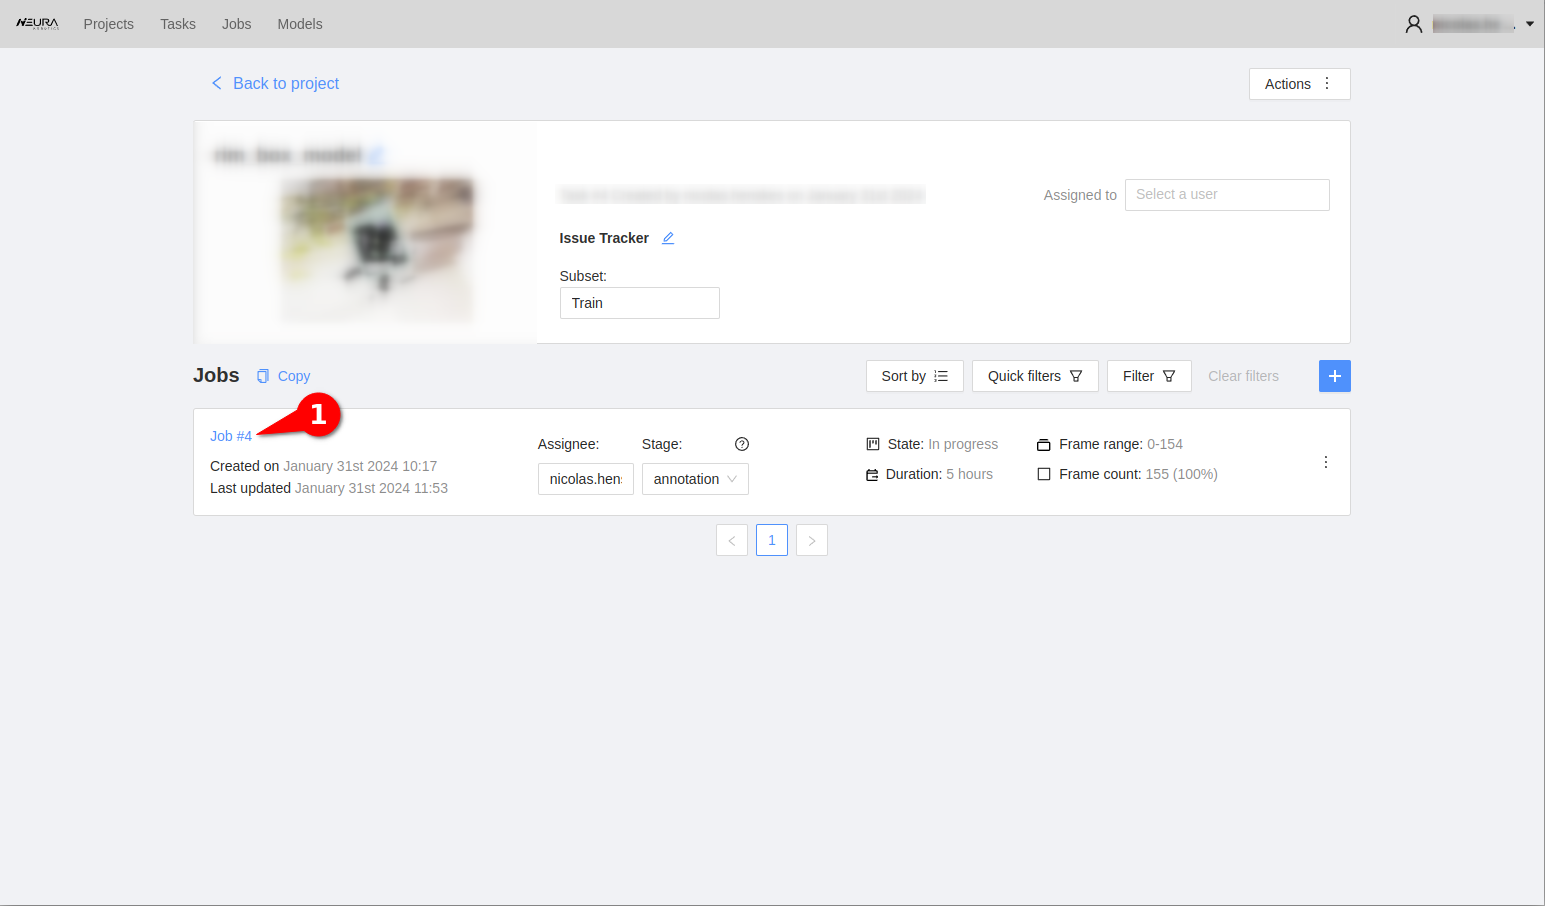
After that, a list of Jobs should appear. You can start the annotation process by clicking on Job#1.
Annotation Menu
AI Tools
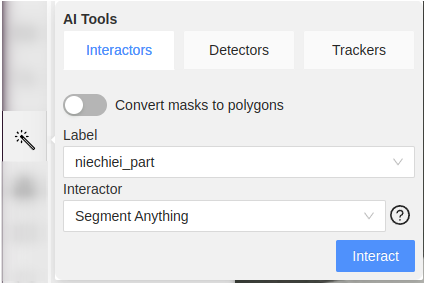
AI Tools include Interactors, Detectors, and Trackers used for automatic annotation.
Interactors allow labeling objects in an image or video, or refining existing annotations. Select a pretrained model, click on an object, and get an automatically generated object mask for this object.
Detectors are designed to automate the annotation process of large image or video datasets. Choose a pretrained object detection model, and get an automatically generated bounding boxes for objects in an image or video.
Trackers are specifically tailored for annotating moving objects in videos, e.g., for object tracking in surveillance or action recognition.Trackers match the objects across frames in a video sequence to maintain temporal consistency of annotations.
OpenCV Tools
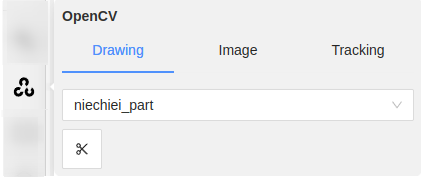
OpenCV Tools include Drawing, Image, and Tracking.
Drawing allows adding shapes, lines, and other graphical elements to an image or a video frame. With Drawing, a user can mark regions of interest or highlight specific areas or objects within an image.
Image allows adding metadata, text, or labels to an image to descriptive information or labels for images within a dataset. With Image, a user can add descriptions or comments on images, add labels or categories.
Tracking allows following and annotating object motions across video frames. Tracking can enable the analysis of object trajectories and evolution of dynamics cenes, as well as annotation of moving objects in videos, such as vehicles or pedestrians.
Apart from automatic tools, there are manual annotation options providing full control over the annotation process.
Click is the basic labeling operation, performed by pressing and releasing the left mouse button.
Draw a Rectangle
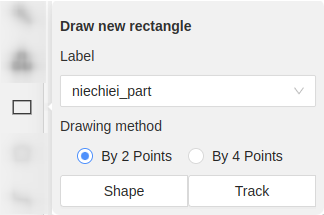
Target application. Rectangular annotations (also known as bounding boxes) are used for object detection and object tracking, e.g., as the initial regions for tracking.
Procedure. Rectangles are defined by clicking the corner points. Axis-aligned rectangles can be annotated with two diagonal corners: Top-Left and Bottom-Right. Oriented rectangles can be annotated with four corners.
Draw a Polygon
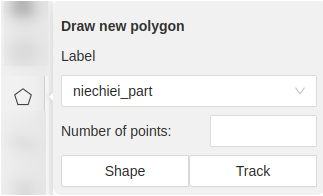
Target application. Polygonal annotations are used for object segmentation, object detection, and object tracking. With polygons, objects can be outlined precisely. Besides, polygons can serve as initial regions for tracking algorithms.
Procedure. Polygons can be labeled by clicking on vertices sequentially. The last vertex is connected to the first, forming a closed polygon.
Draw a Polyline
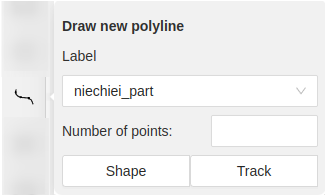
Target application. Polyline is a series of connected line segments. With polyline, a user can outline objects or define paths or trajectories within a scene for object segmentation, detection, and tracking.
Procedure. Polylines can be labeled by clicking on vertices sequentially. The last vertex is connected to the first, forming a closed shape.
Draw Points

Target application. Points mark locations of interest within an image, that can be used for keypoint detection and as a weak supervision for other computer vision tasks.
Procedure. Points can be labeled by clicking on the desired location in an image.
Draw an Ellipse
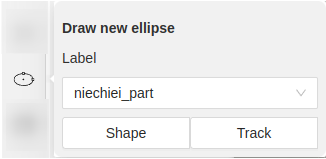
Target application. Ellipses can be used for labeling objects with elliptical shapes for object segmentation, detection and tracking.
- Procedure.
Specify the coordinates of a center
Define the major and minor axes lengths
Specify the rotation angle.
Draw a Mask

Target application. Pixel-level binary masks can be used to define regions of interest for object segmentation, detection and tracking.
Procedure. Masks are drawn on top of an image using a painting tool.
Setup a Tag
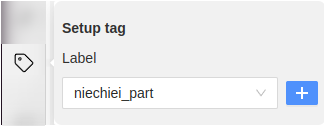
Target application. A tag allows categorizing annotated objects so that they can be easily found, sorted, filtered or analyzed.
Procedure. An object can be assigned with a tag via Setup tag. The tag can be selected from the existing tags, or a new tag can be created.
Basic Image Manipulation

The basic image manipulation functions include:
allows navigating and interacting with the CVAT interface: pointing, clicking, and selecting various elements on the screen.
allows moving the image within the CVAT workspace to focus on specific areas of the image.
rotates the image clockwise or anticlockwise.
allows adjusting the view to fit the entire image within the CVAT workspace to get an overview of the entire content.
allows specifying an area or region in the image that you want to focus on or annotate.
Menu and Navigation
The top menu features controls for task management.
Adjacent Controls
allows saving current progress and annotations.
reverses the last action performed.
restores an action that was undone.
Utility Panel
expands the CVAT interface to occupy the entire screen.
provides detailed information about the annotation task.
allows filtering annotations.
allows switching between task modification or review mode.
Object Configuration Panel
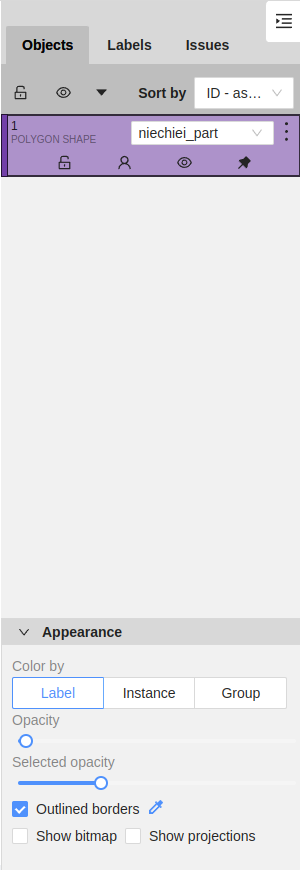
displays a list of annotation objects in the current task.
allows management of annotation objets and assigning labels to them.
displays issues or comments related to the annotations.
allows sorting the displayed annotations based on certain criteria, such as label, creation time, or other relevant parameters.
allows selecting the shape type for annotation objects, with “Polygon Shape” being one of the menus.
provides an access tp visual appearance of annotations, such as color, opacity, and border settings.
allows color-coding annotations based on their labels, aiding in visual distinction between different classes.
allows grouping instances of the same label.
opens transparency settings for annotations (both selected and unselected states).
allows toggling between having outlined or filled borders for the annotation shapes.
displays or hides bitmap images related to annotations.
displays or hides projections associated with annotations.
Shortcuts
Shortcut |
Action |
|---|---|
|
Open/hide the list of available shortcuts |
|
Repeat the latest procedure of drawing with the same parameters |
|
Activate or deactivate mode to merging shapes |
|
Activate or deactivate mode to splitting shapes |
|
Activate or deactivate mode to grouping shapes |
|
Reset group for selected shapes (in group mode) |
|
Cancel any active canvas mode |
|
Copy shape to CVAT internal clipboard |
|
Paste a shape from internal CVAT clipboard |
Hold |
When pasting shape from the buffer for multiple pasting. |
|
Make a copy of the object on the following frames |
|
Changes a label for an activated object or for the next drawn object if no objects are activated |
Model Training and Testing
In the section, you can train deep learning models for various AI tasks (e.g., object detection) using generated datasets.
Model Training
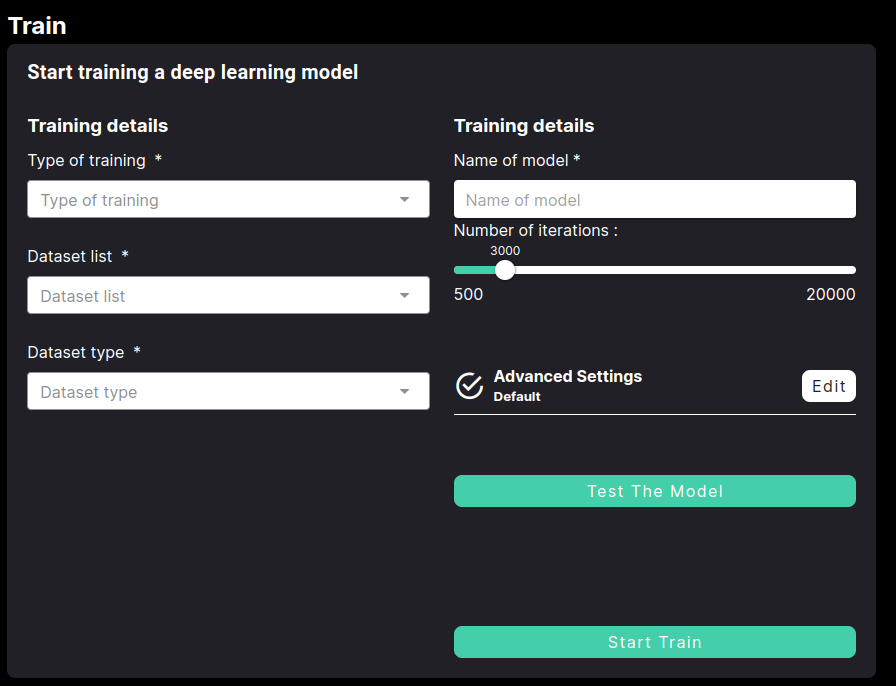
Training parameters
The training interface allows you to configure the following parameters:
Parameter |
Description |
|---|---|
Type of training |
Select the task for training
|
Method |
Choose an available method (e.g., neura_DLIS1) for the selected task. The method determines the algorithm and architecture used for training. |
Dataset list |
Choose the dataset(s) for training from available datasets. |
Dataset type |
Choose the dataset type (e.g., real, synthetic etc.) |
Name of model |
Provide a custom name for your model (e.g., my_first_model). |
Number of Iterations |
Define the total number of training steps using the slider (e.g., 500 iterations for small datasets of ~30 images, 2000 iterations for medium datasets [~200 images]). |
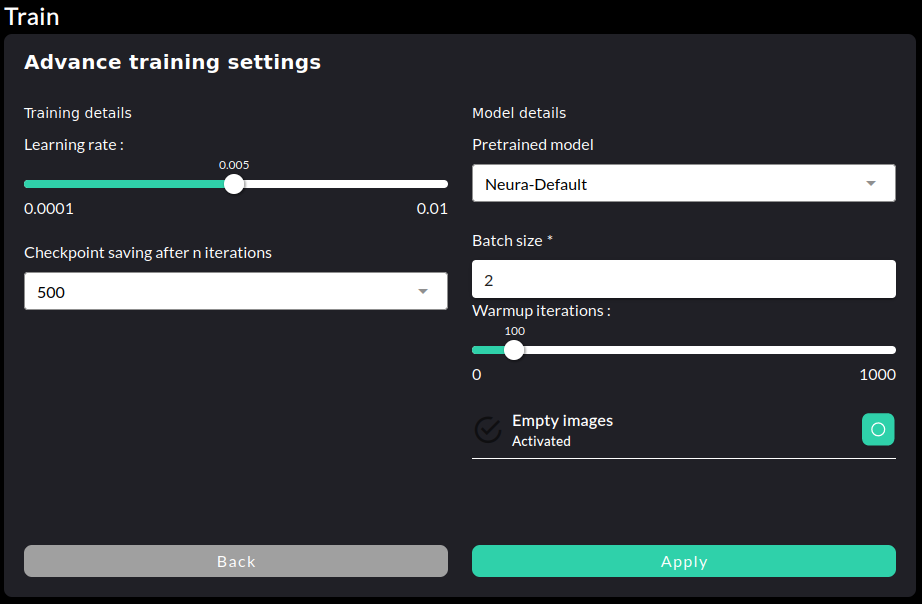
Advanced Training parameters
Click on to access and adjust advanced hyperparameters for model training.
Parameter |
Description |
|---|---|
Learning rate |
Set the learning rate for training, which controls how much the model adjusts weights with each iteration. |
Checkpoint saving after n iterations |
Define the interval (in iterations) at which the training process saves checkpoints, enabling recovery and resuming from saved states. |
Pretrained model |
Choose a pretrained model as the starting point for training. |
Batch size |
Specify the number of samples processed together during a single training step. |
Warmup iterations |
Define the number of iterations for a warmup phase, during which the learning rate gradually increases to its configured value. |
Empty images |
Toggle the use of empty images during training. This option can help the model learn to handle cases with no objects detected in an image. |
Best Practices
Ensure clean, diverse, and representative datasets to enhance model performance and generalization.
Different lighting conditions and varied backgrounds
Vary object positions and camera angles
When training a model with multiple objects, provide approximately the same amount of data for each object to maintain balance and prevent bias.
Incorporate both synthetic and real datasets to improve model robustness and adaptability to real-world scenarios.
Include data about the actual use-case environment.
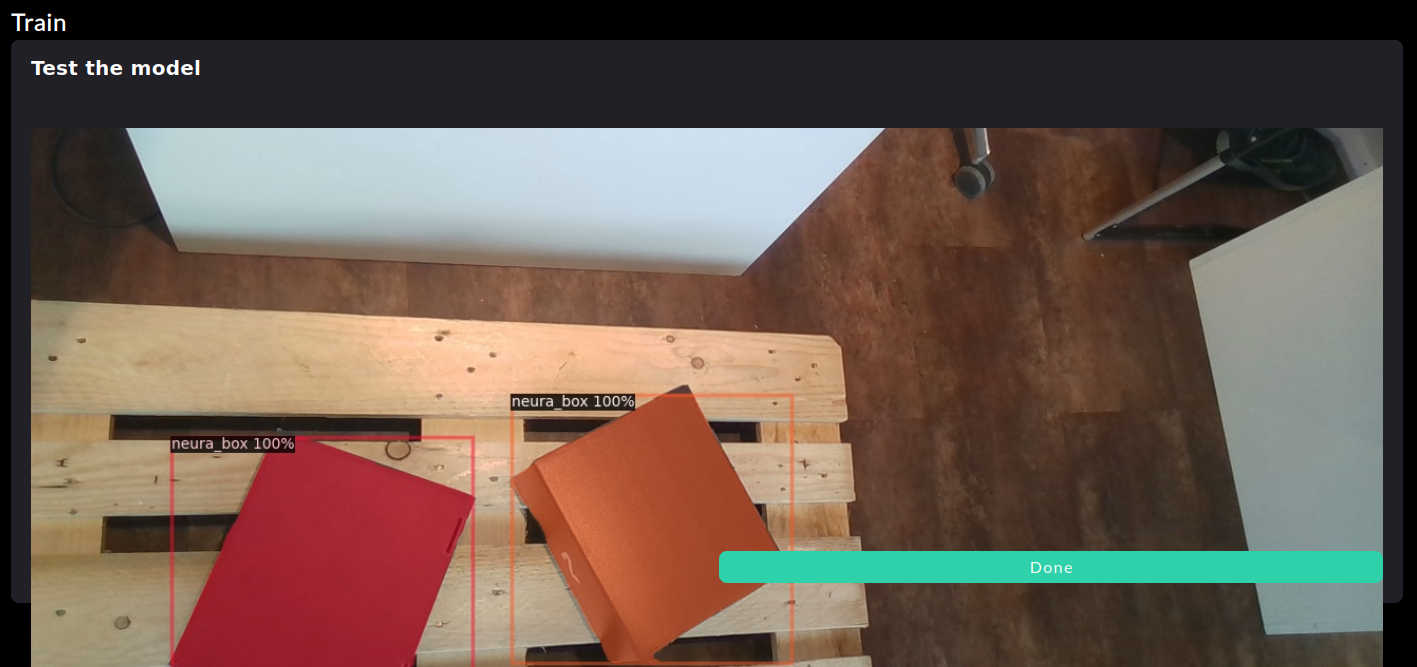
Model Testing
A trained model’s qualitative performance can be evaluated by making live inferences. Click on to choose the model to be tested on the live camera feed.
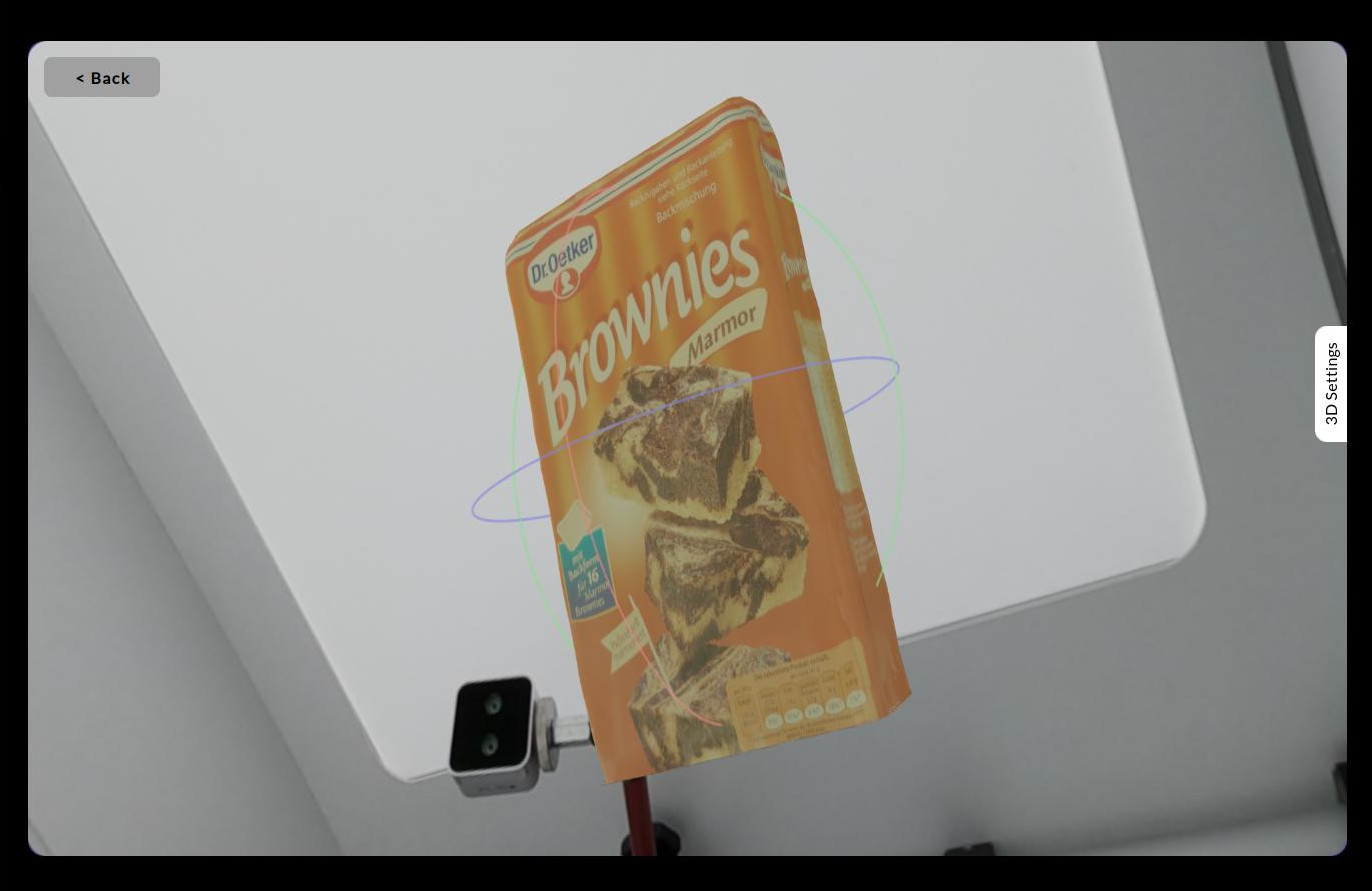
3D Object Scanning (Scan Box only)
The 3D object scanning software allows creating a full textured 3D mesh model of an object given multiple views. For scanning, the Neura Scan Box is needed.
The Scan Box of the Neura AI Hub.
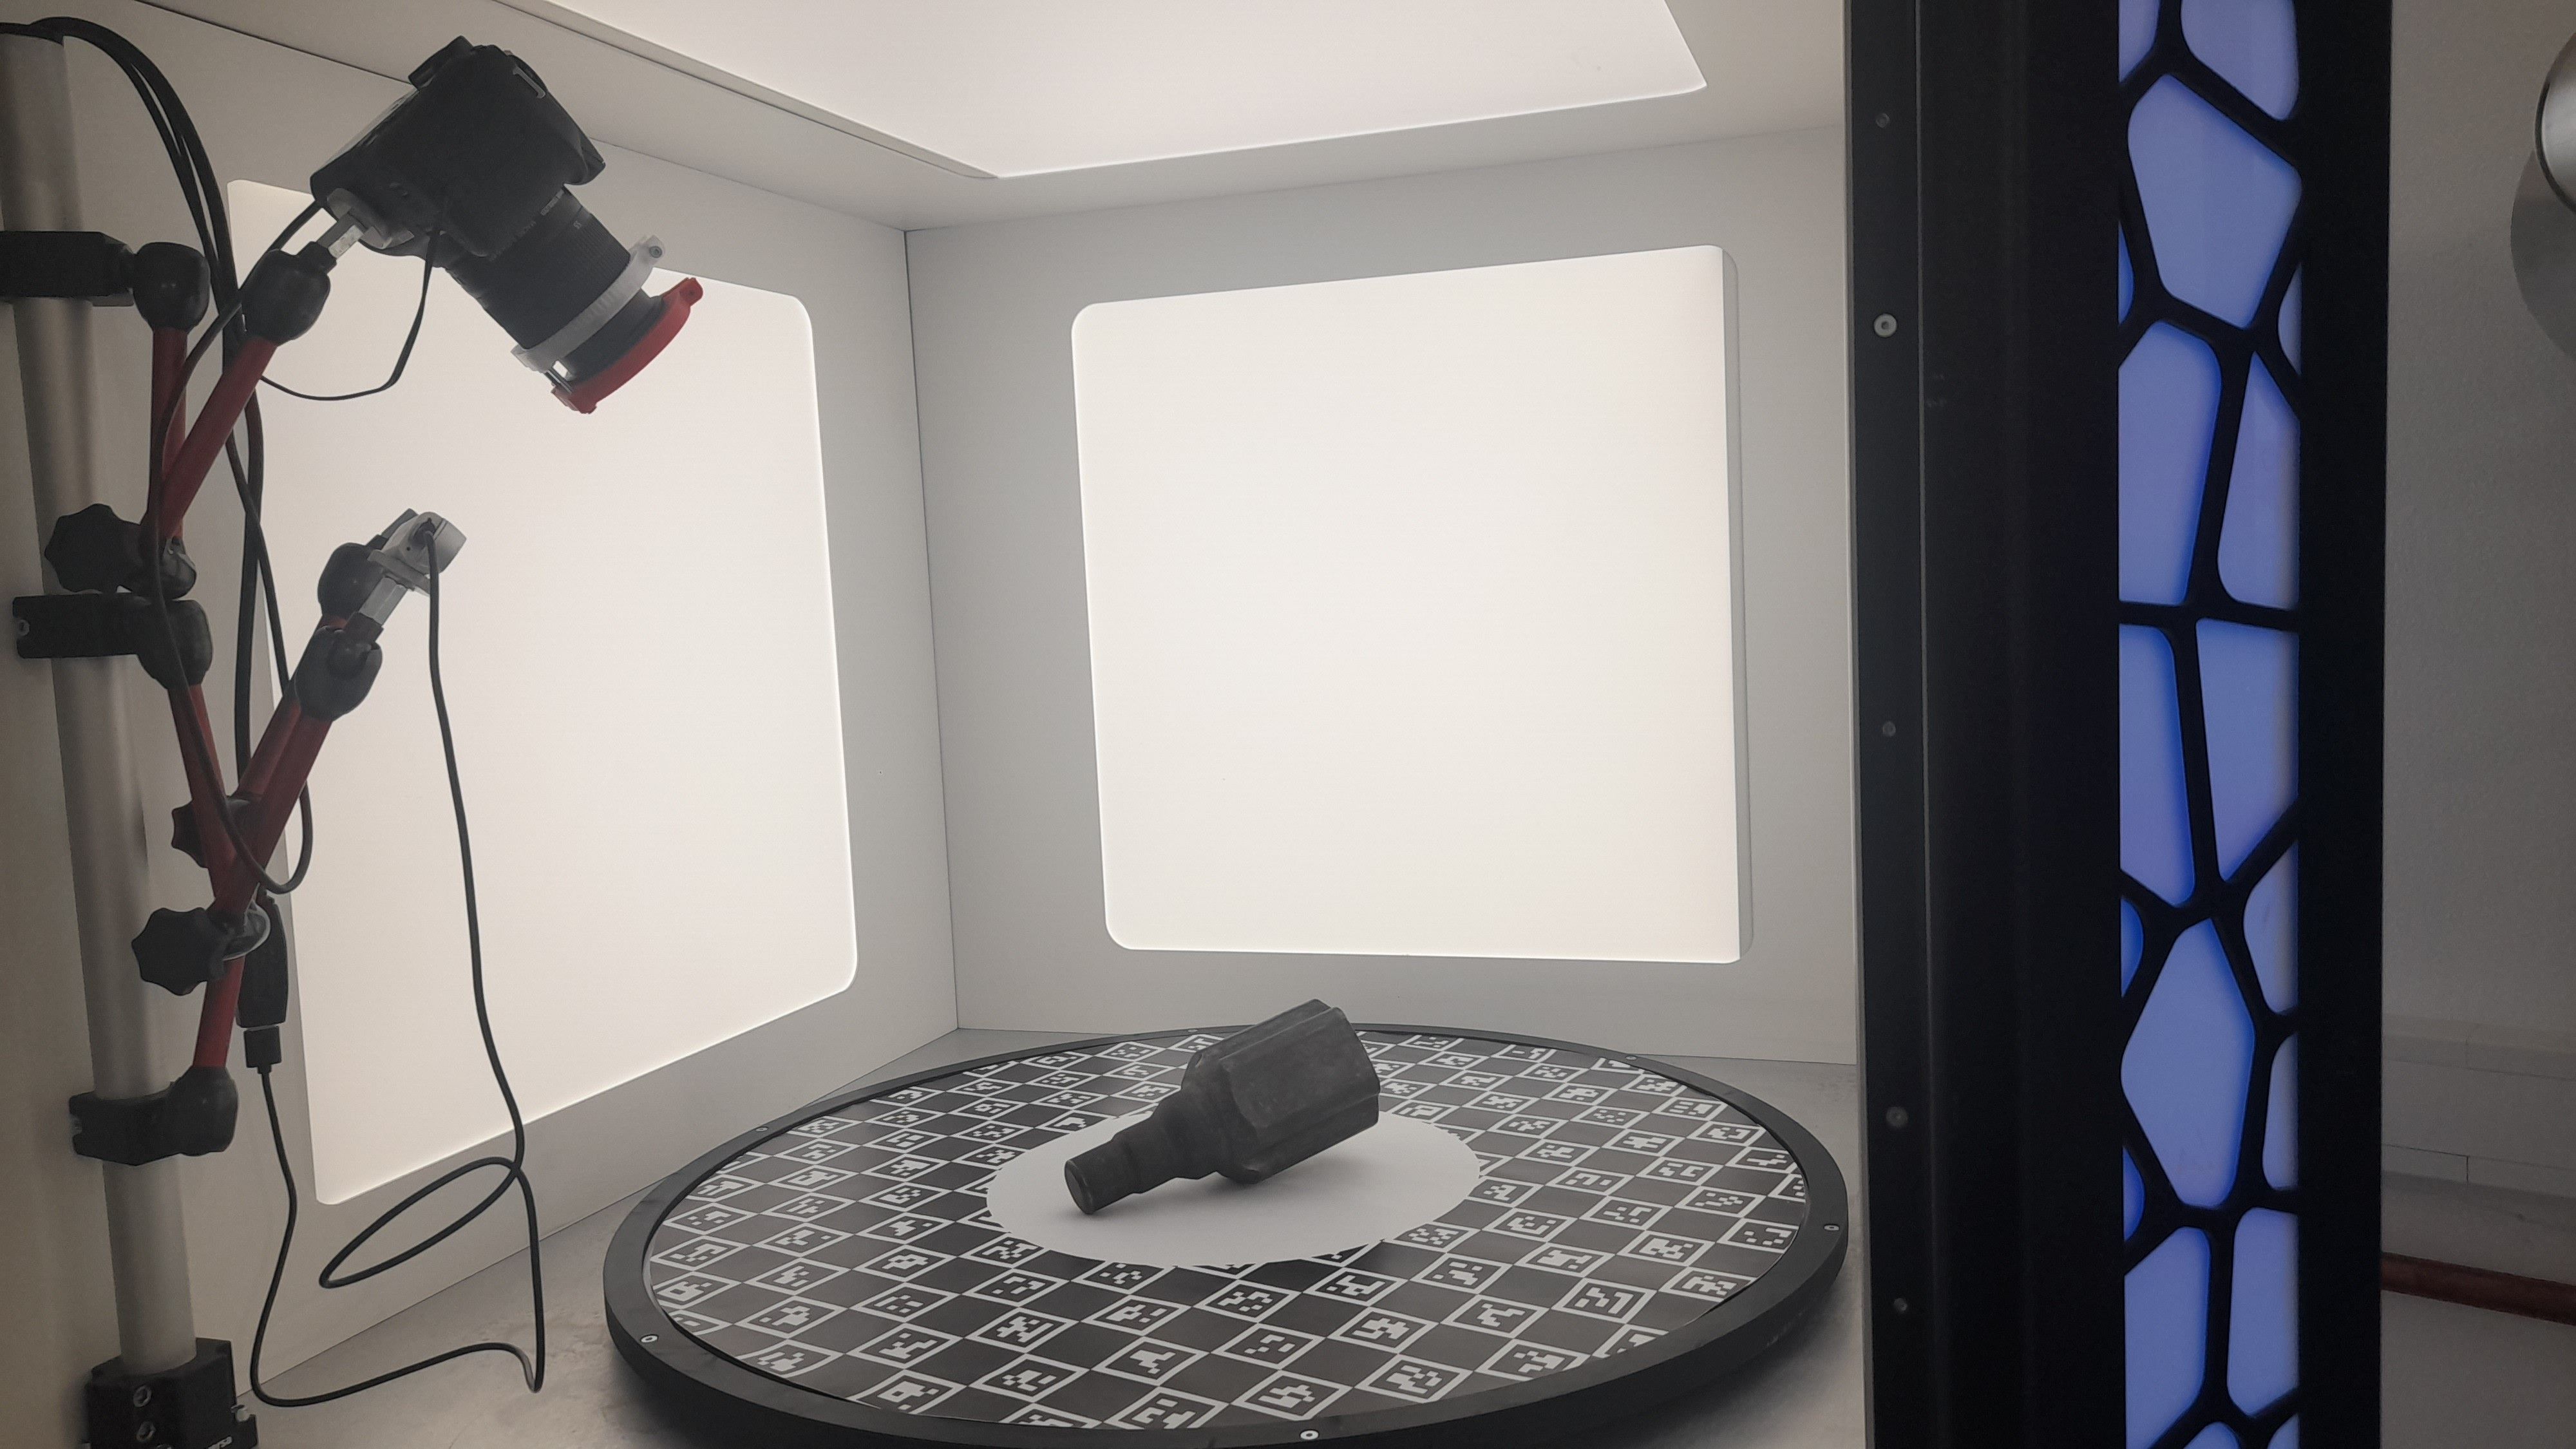
Creating a comprehensive 3D model of an object.
Objects should be scanned to enable object detection and pose estimation. To scan an object, turn on the Scan Box and place the object in the middle of the table. Make sure to close the door, before starting the scan.
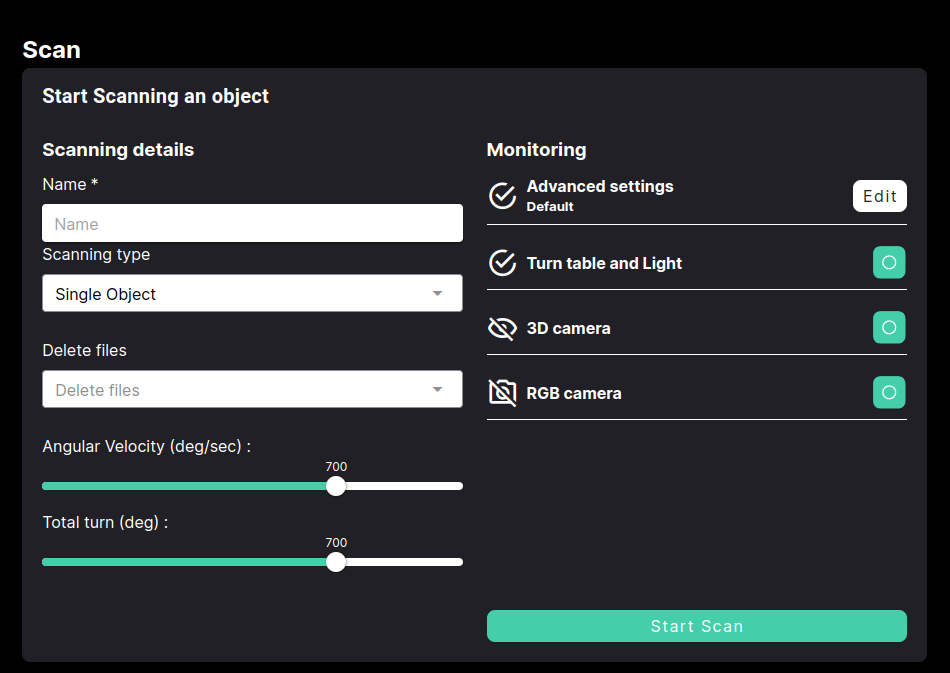
Set to Single Object or Multiple Objects to scan one or several objects, respectively.
Adjust and
Monitoring tab provides advanced settings. Here, you can deactivate and activate turn table movement, adjust light, and turn off the RGB camera.
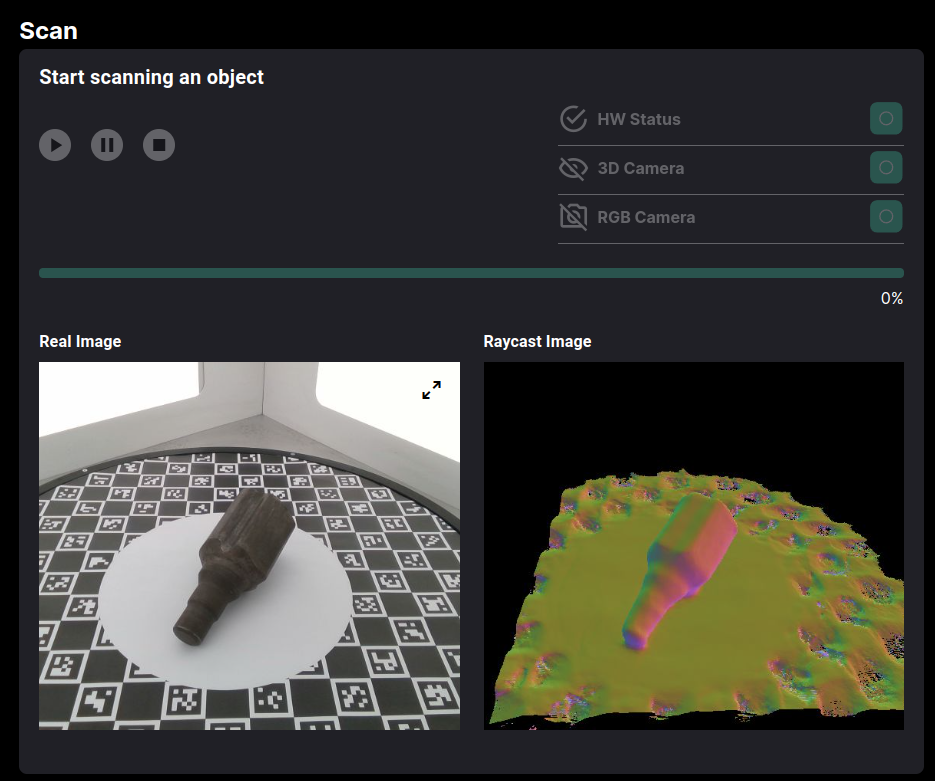
Click Start Scan to start scanning. While table spins, you can see the real image and raycast image.
Video Guide
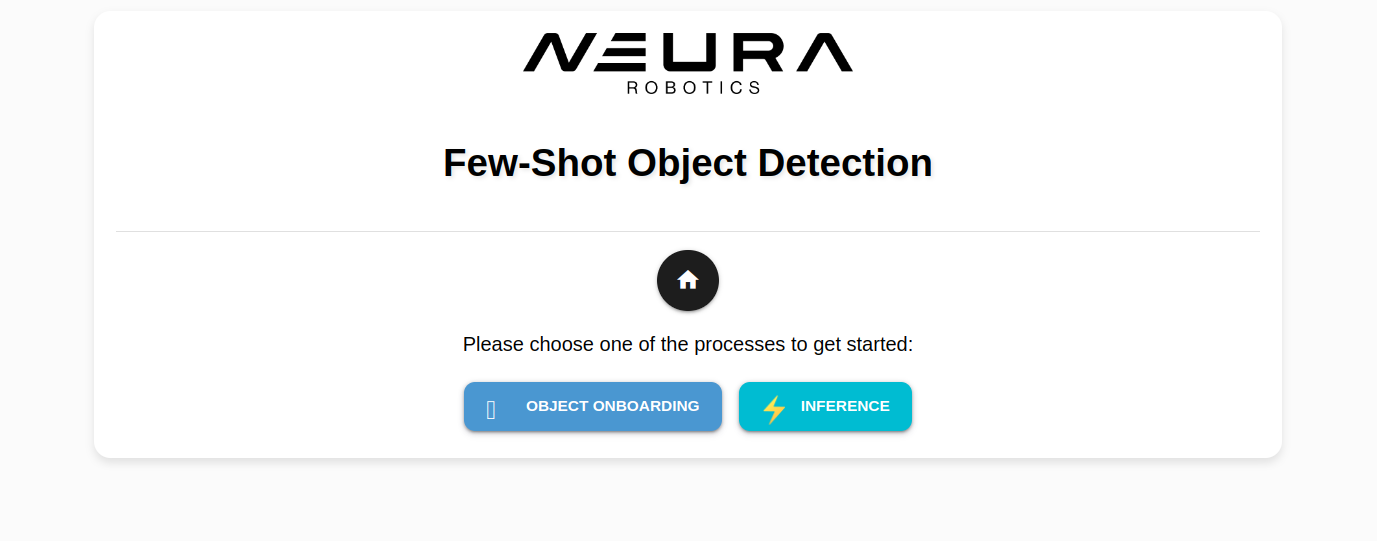
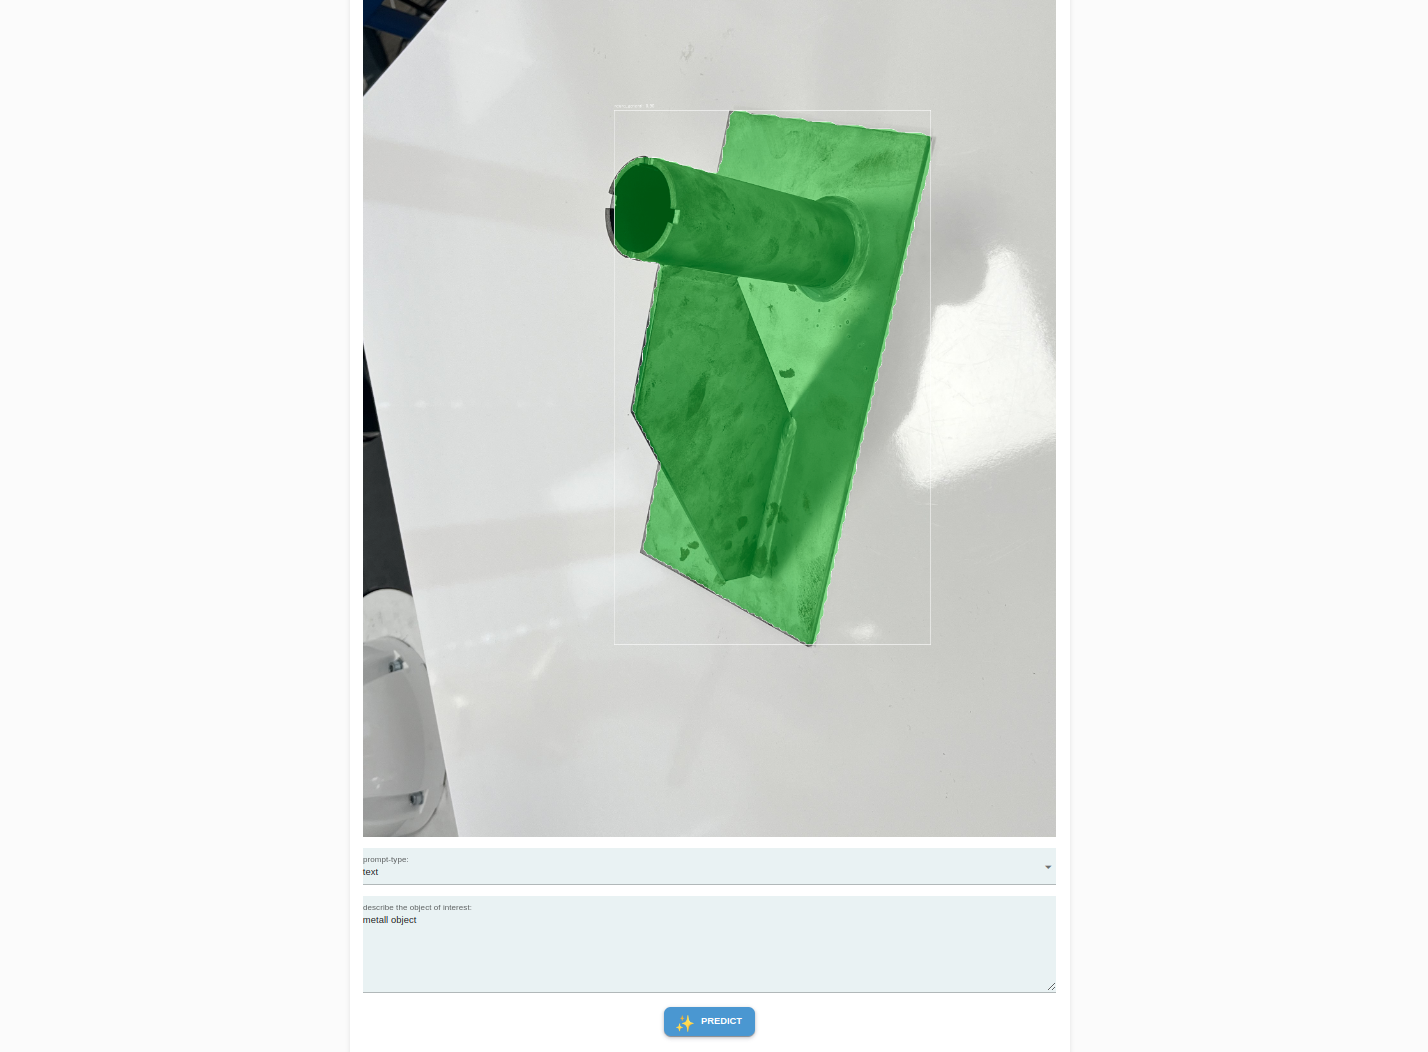
AI Development Arena
The AI Dev Arena is a space hosting experimental (beta) features from AI Hub. It is designed to give our most enthusiastic users early access to upcoming AI capabilities and collect valuable feedback to shape the future of the AI Hub.
Note
To access AI Dev Arena, use an external PC connection to the robot. Then, open the link http://192.168.2.14:8089 via Mozilla Firefox or any other Chromium-based browser.
Hint
AI Dev Arena works best with Mozilla Firefox browser.
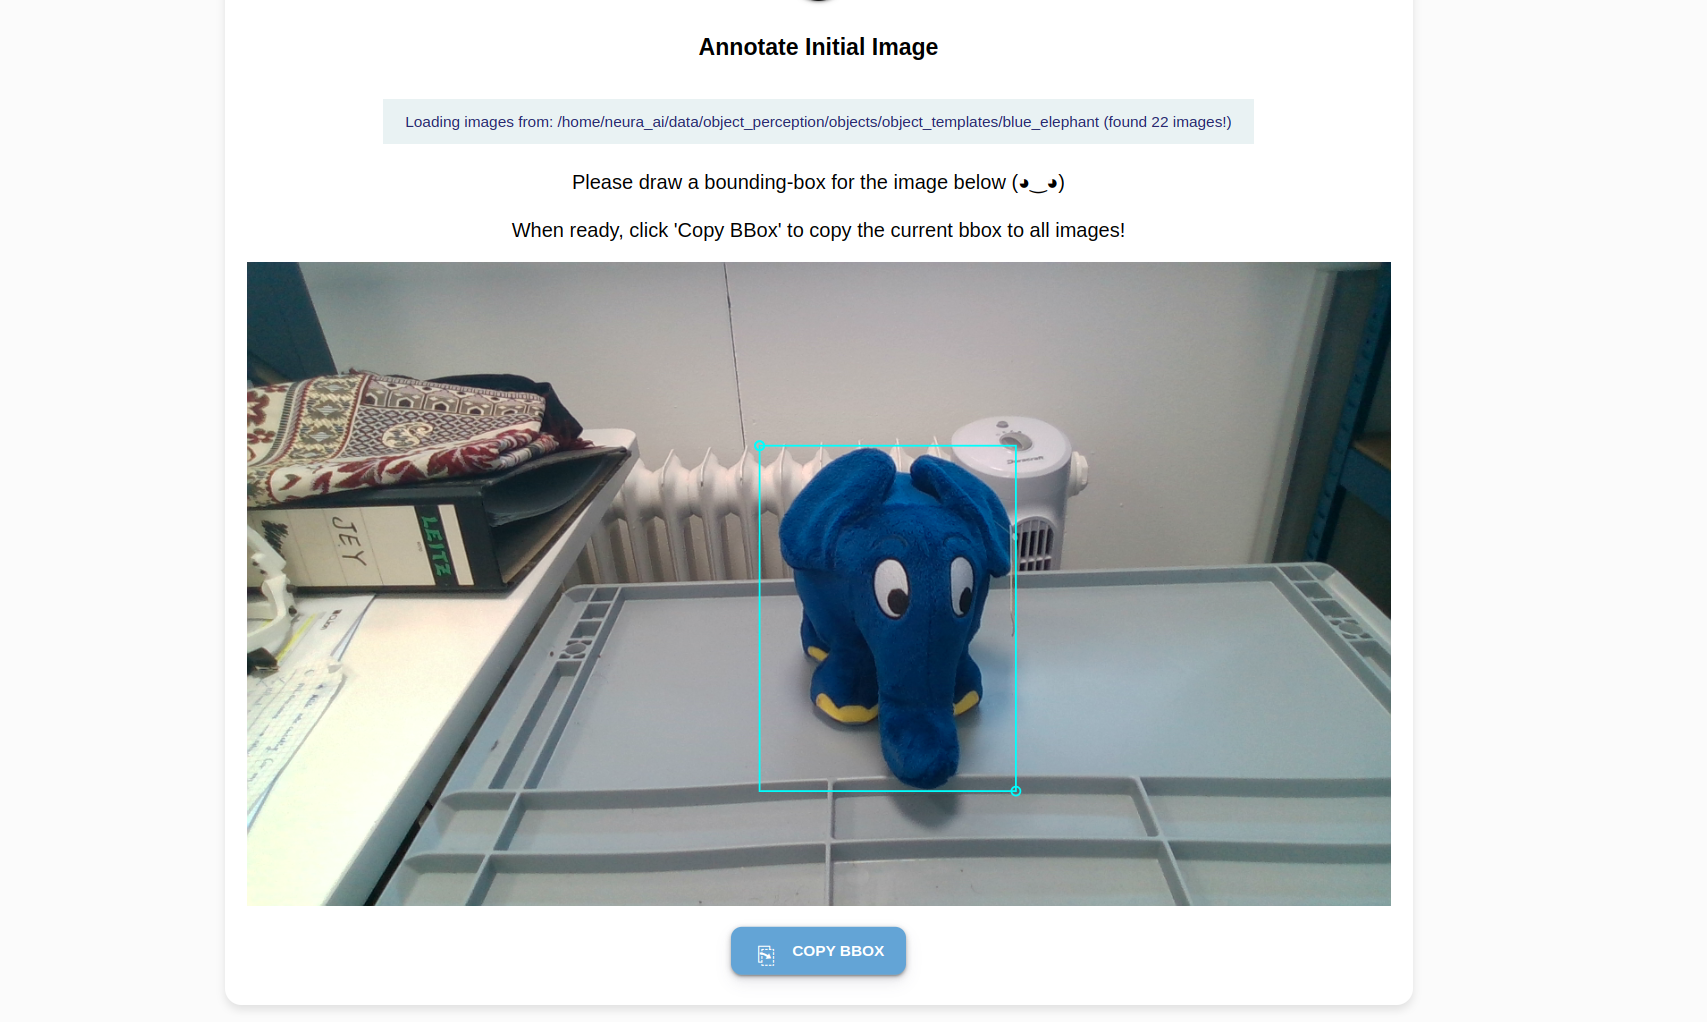
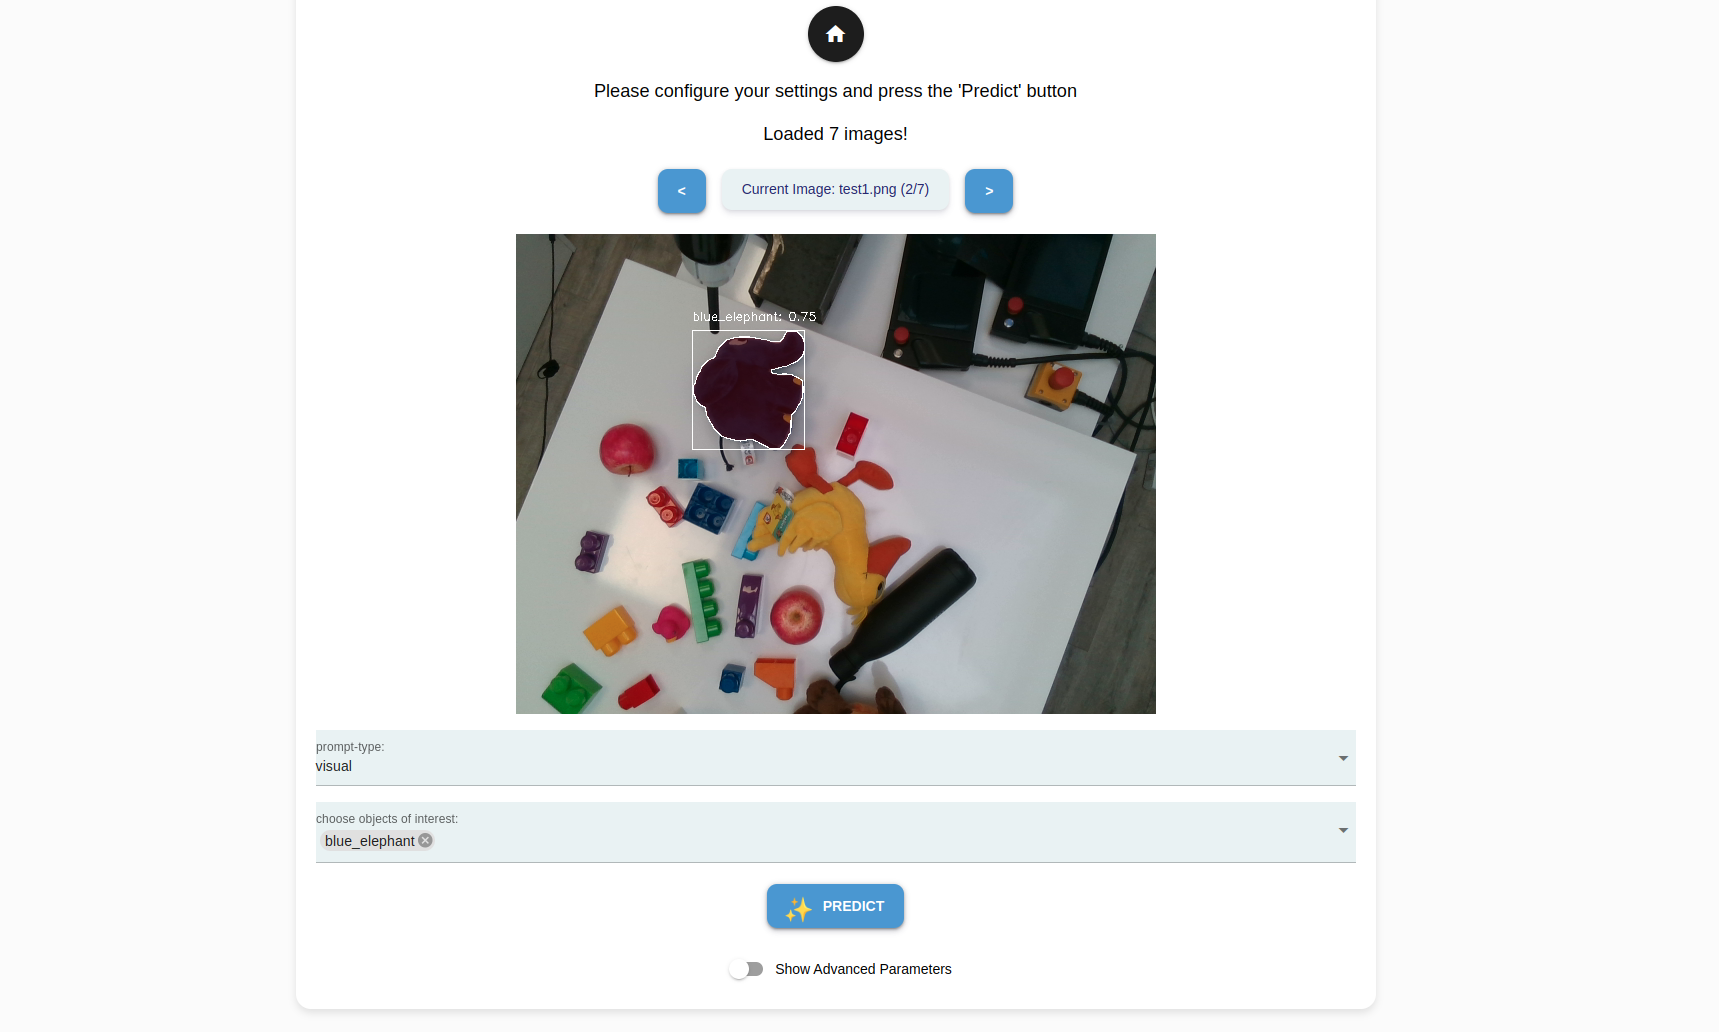
Object Onboarding Wizard
The Object Onboarding Wizard is a tool that lets you quickly teach new objects to the robot using just a few images. It uses a foundation model as its base and applies additive learning to recognize new objects. Key benefits include:
Fast training and object onboarding (~5 mins per object)
Automatic processing of images
High detection accuracy
Simple interface for capturing and training
Works with new objects without extensive data
The wizard guides you through the process of capturing images and handles all the training automatically.
Screenshots
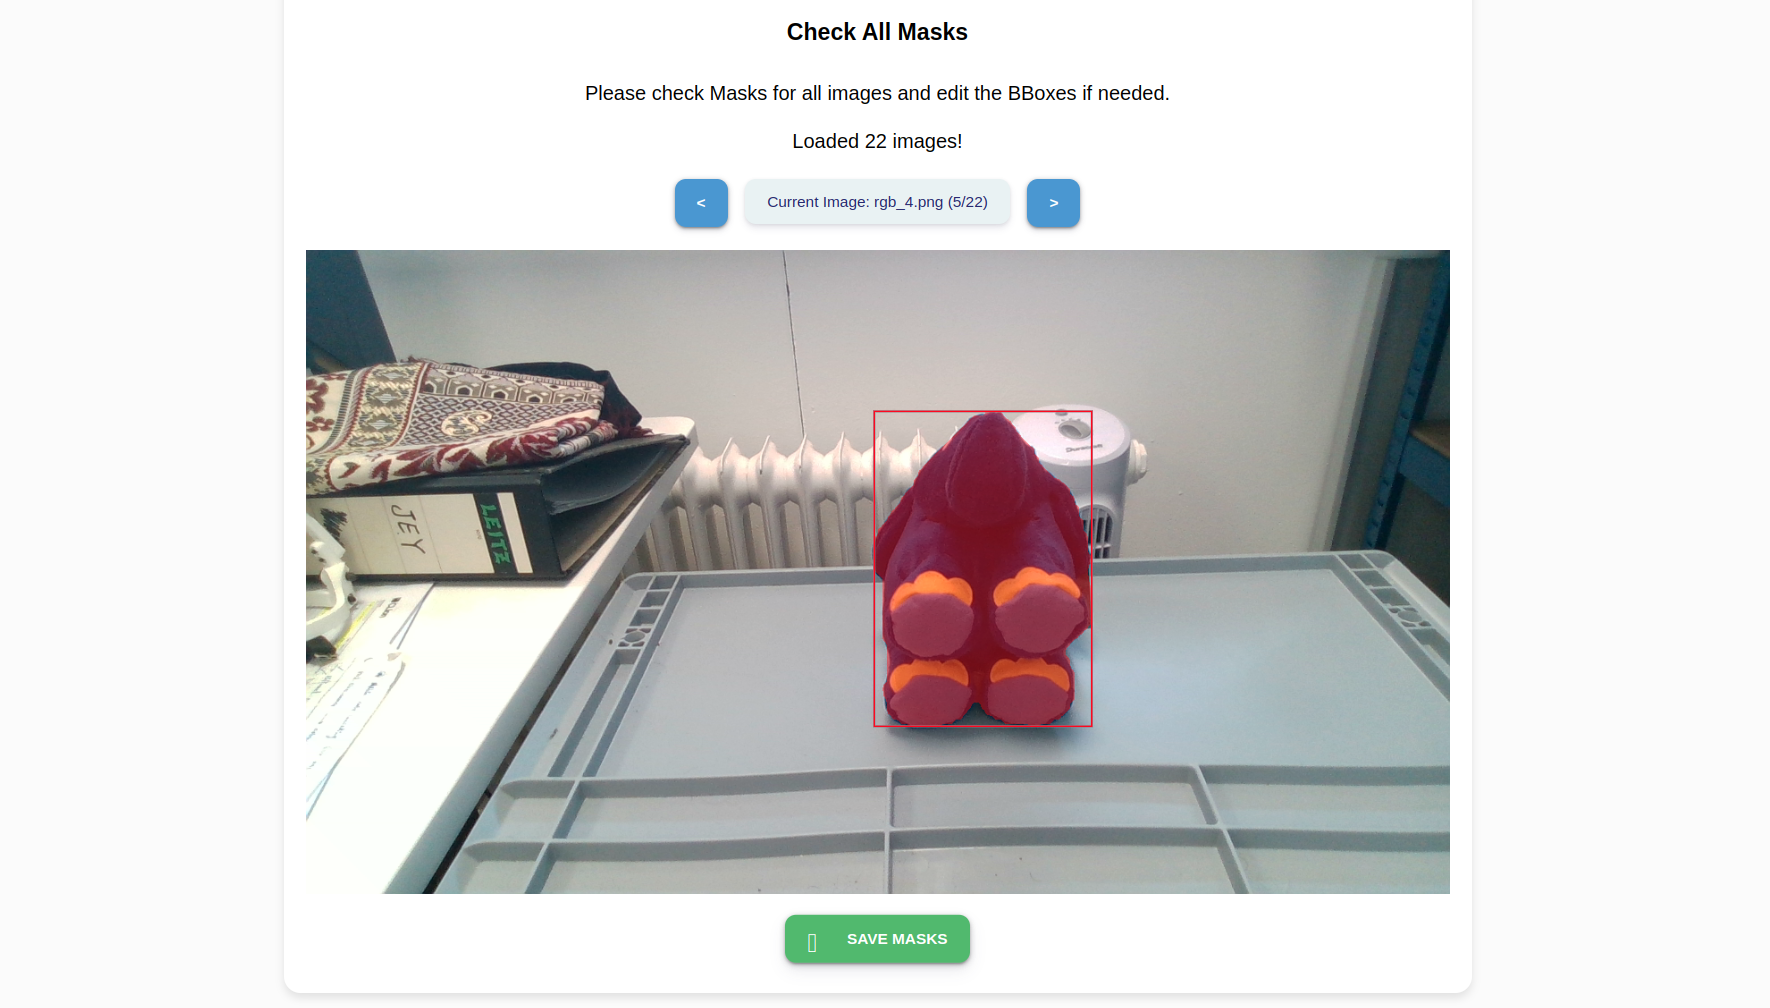
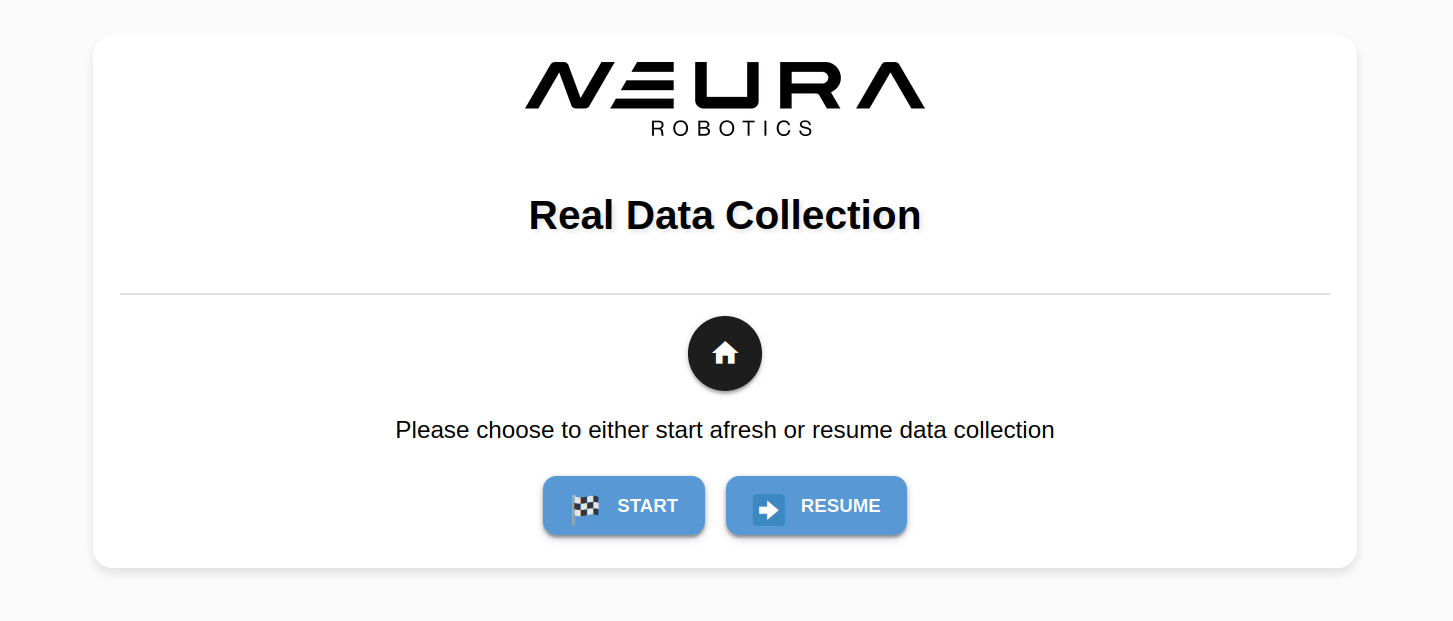
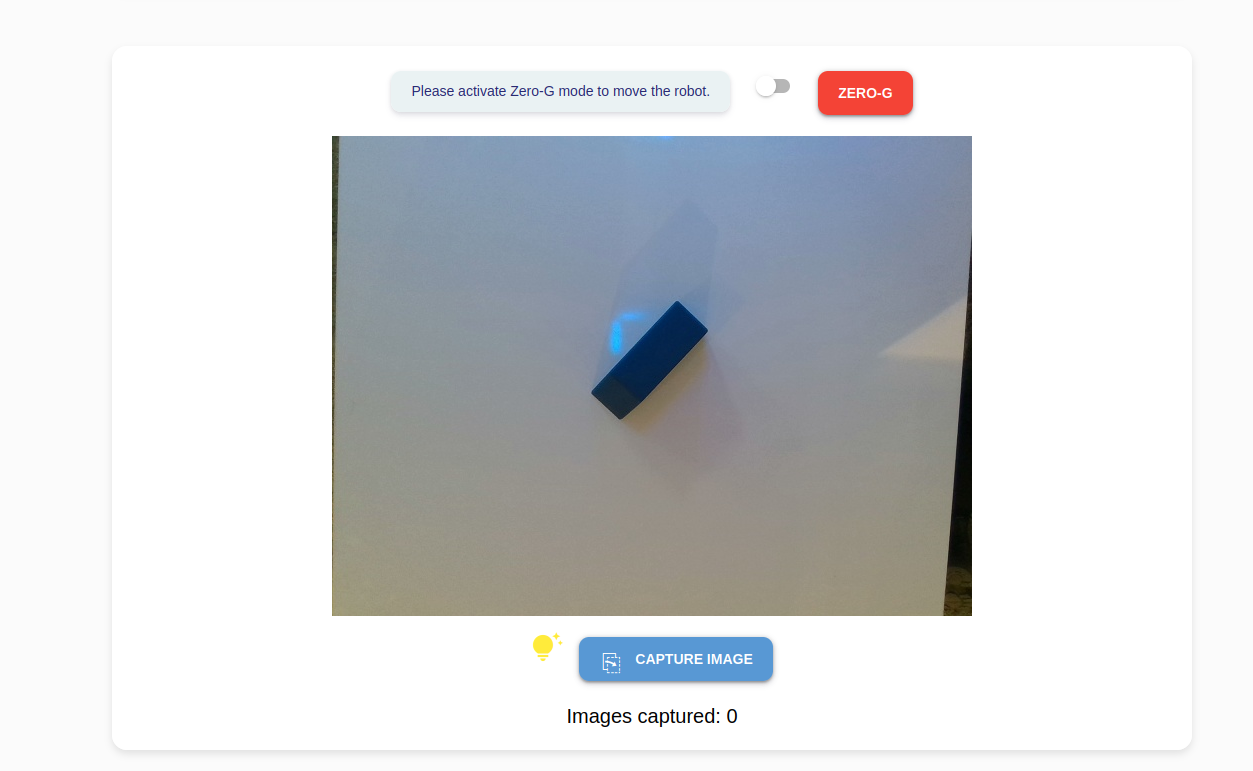
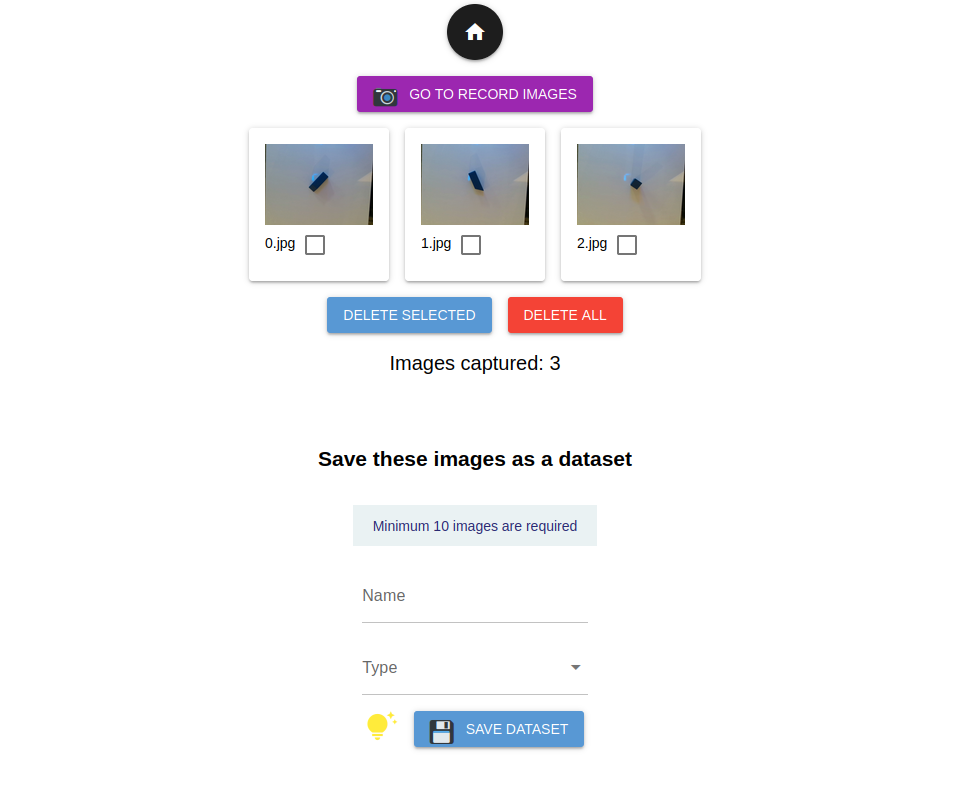
Real Data Collection Wizard
The Real Data Collection Wizard offers a seamless solution for creating datasets using the robot’s vision sensors.
Note
Screenshots
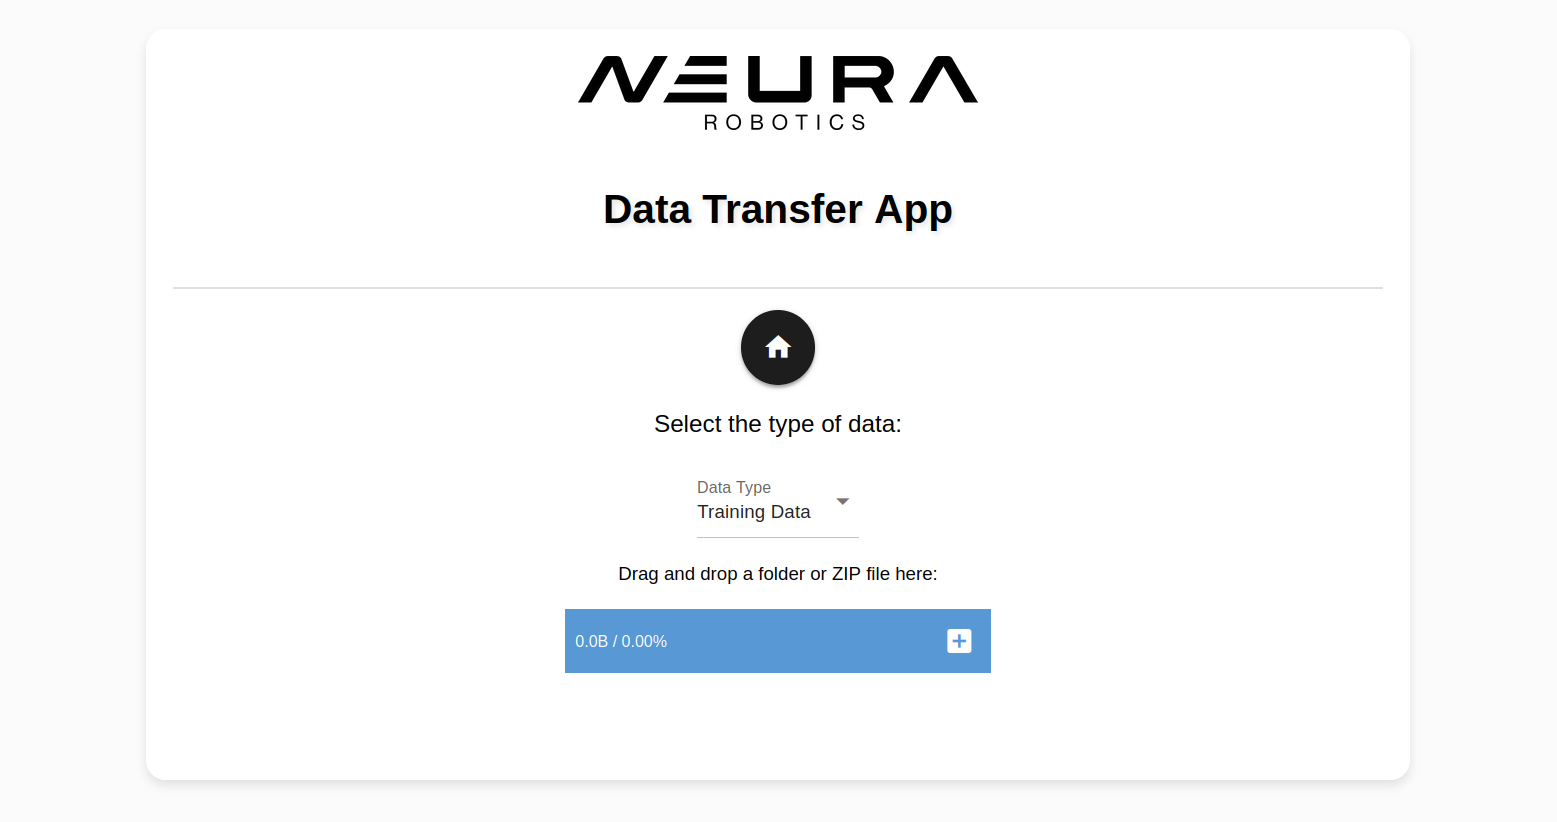
Data Transfer App
This simple data transfer app streamlines the process of transferring data into AI Hub database by eliminating the need to switch between Robot Mode and AI Hub mode.
Note
The only supported functionality as of this release is training data
transfers to train a neura_DLIS1 model.
After exporting your annotated dataset from Neura CVAT, simply select the Data type: Training Data and upload the downloaded ZIP file.
Screenshots